Quantcast
Channel: ASP.NET Core – Software Engineering
Viewing all 169 articles
Browse latest View live

Using Angular in an ASP.NET Core View with Webpack

$
0
0

This article shows how Angular can be run inside an ASP.NET Core MVC view using Webpack to build the Angular application. By using Webpack, the Angular application can be built using the AOT and Angular lazy loading features and also profit from the advantages of using a server side rendered view. If you prefer to separate the SPA and the server into 2 applications, use Angular CLI or a similiar template.

Code: https://github.com/damienbod/AspNetCoreMvcAngular

Blogs in this Series

The application was created using the .NET Core ASP.NET Core application template in Visual Studio 2017. A packages.json npm file was added to the project. The file contains the frontend build scripts as well as the npm packages required to build the application using Webpack and also the Angular packages.

{
  "name": "angular-webpack-visualstudio",
  "version": "1.0.0",
  "description": "An Angular VS template",
  "author": "",
  "license": "ISC",
    "repository": {
    "type": "git",
    "url": "https://github.com/damienbod/Angular2WebpackVisualStudio.git"
  },
  "scripts": {
    "ngc": "ngc -p ./tsconfig-aot.json",
    "webpack-dev": "set NODE_ENV=development && webpack",
    "webpack-production": "set NODE_ENV=production && webpack",
    "build-dev": "npm run webpack-dev",
    "build-production": "npm run ngc && npm run webpack-production",
    "watch-webpack-dev": "set NODE_ENV=development && webpack --watch --color",
    "watch-webpack-production": "npm run build-production --watch --color",
    "publish-for-iis": "npm run build-production && dotnet publish -c Release",
    "test": "karma start"
  },
  "dependencies": {
    "@angular/common": "4.1.0",
    "@angular/compiler": "4.1.0",
    "@angular/compiler-cli": "4.1.0",
    "@angular/platform-server": "4.1.0",
    "@angular/core": "4.1.0",
    "@angular/forms": "4.1.0",
    "@angular/http": "4.1.0",
    "@angular/platform-browser": "4.1.0",
    "@angular/platform-browser-dynamic": "4.1.0",
    "@angular/router": "4.1.0",
    "@angular/upgrade": "4.1.0",
    "@angular/animations": "4.1.0",
    "angular-in-memory-web-api": "0.3.1",
    "core-js": "2.4.1",
    "reflect-metadata": "0.1.10",
    "rxjs": "5.3.0",
    "zone.js": "0.8.8",
    "bootstrap": "^3.3.7",
    "ie-shim": "~0.1.0"
  },
  "devDependencies": {
    "@types/node": "7.0.13",
    "@types/jasmine": "2.5.47",
    "angular2-template-loader": "0.6.2",
    "angular-router-loader": "^0.6.0",
    "awesome-typescript-loader": "3.1.2",
    "clean-webpack-plugin": "^0.1.16",
    "concurrently": "^3.4.0",
    "copy-webpack-plugin": "^4.0.1",
    "css-loader": "^0.28.0",
    "file-loader": "^0.11.1",
    "html-webpack-plugin": "^2.28.0",
    "jquery": "^3.2.1",
    "json-loader": "^0.5.4",
    "node-sass": "^4.5.2",
    "raw-loader": "^0.5.1",
    "rimraf": "^2.6.1",
    "sass-loader": "^6.0.3",
    "source-map-loader": "^0.2.1",
    "style-loader": "^0.16.1",
    "ts-helpers": "^1.1.2",
    "tslint": "^5.1.0",
    "tslint-loader": "^3.5.2",
    "typescript": "2.3.2",
    "url-loader": "^0.5.8",
    "webpack": "^2.4.1",
    "webpack-dev-server": "2.4.2",
    "jasmine-core": "2.5.2",
    "karma": "1.6.0",
    "karma-chrome-launcher": "2.0.0",
    "karma-jasmine": "1.1.0",
    "karma-sourcemap-loader": "0.3.7",
    "karma-spec-reporter": "0.0.31",
    "karma-webpack": "2.0.3"
  },
  "-vs-binding": {
    "ProjectOpened": [
      "watch-webpack-dev"
    ]
  }
}

The angular application is added to the angularApp folder. This frontend app implements a default module and also a second about module which is lazy loaded when required (About button clicked). See Angular Lazy Loading with Webpack 2 for further details.

The _Layout.cshtml MVC View is also added here as a template. This will be used to build into the MVC application in the Views folder.

The webpack.prod.js uses all the Angular project files and builds them into pre-compiled AOT bundles, and also a separate bundle for the about module which is lazy loaded. Webpack adds the built bundles to the _Layout.cshtml template and copies this to the Views/Shared/_Layout.cshtml file.

var path = require('path');

var webpack = require('webpack');

var HtmlWebpackPlugin = require('html-webpack-plugin');
var CopyWebpackPlugin = require('copy-webpack-plugin');
var CleanWebpackPlugin = require('clean-webpack-plugin');
var helpers = require('./webpack.helpers');

console.log('@@@@@@@@@ USING PRODUCTION @@@@@@@@@@@@@@@');

module.exports = {

    entry: {
        'vendor': './angularApp/vendor.ts',
        'polyfills': './angularApp/polyfills.ts',
        'app': './angularApp/main-aot.ts' // AoT compilation
    },

    output: {
        path: __dirname + '/wwwroot/',
        filename: 'dist/[name].[hash].bundle.js',
        chunkFilename: 'dist/[id].[hash].chunk.js',
        publicPath: ''
    },

    resolve: {
        extensions: ['.ts', '.js', '.json', '.css', '.scss', '.html']
    },

    devServer: {
        historyApiFallback: true,
        stats: 'minimal',
        outputPath: path.join(__dirname, 'wwwroot/')
    },

    module: {
        rules: [
            {
                test: /\.ts$/,
                loaders: [
                    'awesome-typescript-loader',
                    'angular-router-loader?aot=true&genDir=aot/'
                ]
            },
            {
                test: /\.(png|jpg|gif|woff|woff2|ttf|svg|eot)$/,
                loader: 'file-loader?name=assets/[name]-[hash:6].[ext]'
            },
            {
                test: /favicon.ico$/,
                loader: 'file-loader?name=/[name].[ext]'
            },
            {
                test: /\.css$/,
                loader: 'style-loader!css-loader'
            },
            {
                test: /\.scss$/,
                exclude: /node_modules/,
                loaders: ['style-loader', 'css-loader', 'sass-loader']
            },
            {
                test: /\.html$/,
                loader: 'raw-loader'
            }
        ],
        exprContextCritical: false
    },

    plugins: [
        new CleanWebpackPlugin(
            [
                './wwwroot/dist',
                './wwwroot/assets'
            ]
        ),
        new webpack.NoEmitOnErrorsPlugin(),
        new webpack.optimize.UglifyJsPlugin({
            compress: {
                warnings: false
            },
            output: {
                comments: false
            },
            sourceMap: false
        }),
        new webpack.optimize.CommonsChunkPlugin(
            {
                name: ['vendor', 'polyfills']
            }),

        new HtmlWebpackPlugin({
            filename: '../Views/Shared/_Layout.cshtml',
            inject: 'body',
            template: 'angularApp/_Layout.cshtml'
        }),

        new CopyWebpackPlugin([
            { from: './angularApp/images/*.*', to: 'assets/', flatten: true }
        ])
    ]
};

The Startup.cs is configured to load the configuration and middlerware for the application using client or server routing as required.

using System;
using System.Collections.Generic;
using System.Linq;
using System.Threading.Tasks;
using Microsoft.AspNetCore.Builder;
using Microsoft.AspNetCore.Hosting;
using Microsoft.Extensions.Configuration;
using Microsoft.Extensions.DependencyInjection;
using Microsoft.Extensions.Logging;
using AspNetCoreMvcAngular.Repositories.Things;
using Microsoft.AspNetCore.Http;

namespace AspNetCoreMvcAngular
{
    public class Startup
    {
        public Startup(IHostingEnvironment env)
        {
            var builder = new ConfigurationBuilder()
                .SetBasePath(env.ContentRootPath)
                .AddJsonFile("appsettings.json", optional: false, reloadOnChange: true)
                .AddJsonFile($"appsettings.{env.EnvironmentName}.json", optional: true)
                .AddEnvironmentVariables();
            Configuration = builder.Build();
        }

        public IConfigurationRoot Configuration { get; }

        public void ConfigureServices(IServiceCollection services)
        {
            services.AddCors(options =>
            {
                options.AddPolicy("AllowAllOrigins",
                    builder =>
                    {
                        builder
                            .AllowAnyOrigin()
                            .AllowAnyHeader()
                            .AllowAnyMethod();
                    });
            });

            services.AddSingleton<IThingsRepository, ThingsRepository>();

            services.AddMvc();
        }

        public void Configure(IApplicationBuilder app, IHostingEnvironment env, ILoggerFactory loggerFactory)
        {
            loggerFactory.AddConsole(Configuration.GetSection("Logging"));
            loggerFactory.AddDebug();

            var angularRoutes = new[] {
                 "/default",
                 "/about"
             };

            app.Use(async (context, next) =>
            {
                if (context.Request.Path.HasValue && null != angularRoutes.FirstOrDefault(
                    (ar) => context.Request.Path.Value.StartsWith(ar, StringComparison.OrdinalIgnoreCase)))
                {
                    context.Request.Path = new PathString("/");
                }

                await next();
            });

            app.UseCors("AllowAllOrigins");

            app.UseDefaultFiles();
            app.UseStaticFiles();

            if (env.IsDevelopment())
            {
                app.UseDeveloperExceptionPage();
                app.UseBrowserLink();
            }
            else
            {
                app.UseExceptionHandler("/Home/Error");
            }

            app.UseStaticFiles();

            app.UseMvc(routes =>
            {
                routes.MapRoute(
                    name: "default",
                    template: "{controller=Home}/{action=Index}/{id?}");
            });
        }
    }
}

The application can be built and run using the command line. The client application needs to be built before you can deploy or run!

> npm install
> npm run build-production
> dotnet restore
> dotnet run

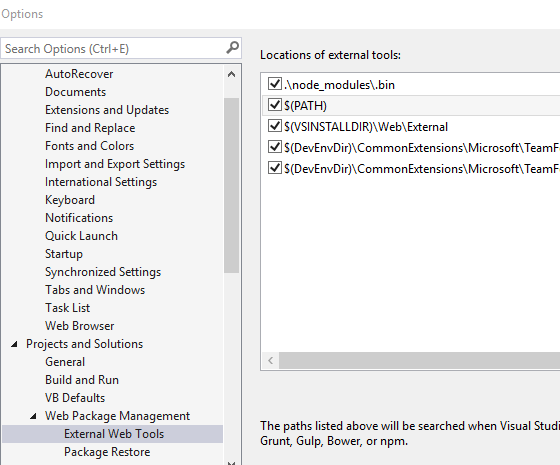
You can also build inside Visual Studio 2017 using the Task Runner Explorer. If building inside Visual Studio 2017, you need to configure the NodeJS path correctly to use the right version.
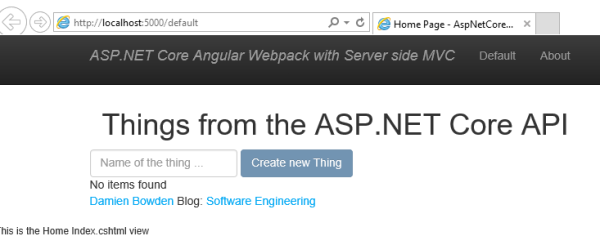
Now you have to best of both worlds in the UI.
Note:
You could also use Microsoft ASP.NET Core JavaScript Services which supports server side pre rendering but not client side lazy loading. If your using Microsoft ASP.NET Core JavaScript Services, configure the application to use AOT builds for the Angulat template.

Links:

Angular Templates, Seeds, Starter Kits

https://github.com/damienbod/AngularWebpackVisualStudio

https://damienbod.com/2016/06/12/asp-net-core-angular2-with-webpack-and-visual-studio/

https://github.com/aspnet/JavaScriptServices


Implementing a silent token renew in Angular for the OpenID Connect Implicit flow

$
0
0

This article shows how to implement a silent token renew in Angular using IdentityServer4 as the security token service server. The SPA Angular client implements the OpenID Connect Implicit Flow ‘id_token token’. When the id_token expires, the client requests new tokens from the server, so that the user does not need to authorise again.

Code: https://github.com/damienbod/AspNet5IdentityServerAngularImplicitFlow

Other posts in this series:

When a user of the client app authorises for the first time, after a successful login on the STS server, the AuthorizedCallback function is called in the Angular application. If the server response and the tokens are successfully validated, as defined in the OpenID Connect specification, the silent renew is initialized, and the token validation method is called.

 public AuthorizedCallback() {

	...

	if (authResponseIsValid) {

		...

		if (this._configuration.silent_renew) {
			this._oidcSecuritySilentRenew.initRenew();
		}

		this.runTokenValidatation();

		this._router.navigate([this._configuration.startupRoute]);
	} else {
		this.ResetAuthorizationData();
		this._router.navigate(['/Unauthorized']);
	}

}

The OidcSecuritySilentRenew Typescript class implements the iframe which is used for the silent token renew. This iframe is added to the parent HTML page. The renew is implemented in an iframe, because we do not want the Angular application to refresh, otherwise for example we would lose form data.

...

@Injectable()
export class OidcSecuritySilentRenew {

    private expiresIn: number;
    private authorizationTime: number;
    private renewInSeconds = 30;

    private _sessionIframe: any;

    constructor(private _configuration: AuthConfiguration) {
    }

    public initRenew() {
        this._sessionIframe = window.document.createElement('iframe');
        console.log(this._sessionIframe);
        this._sessionIframe.style.display = 'none';

        window.document.body.appendChild(this._sessionIframe);
    }

    ...
}

The runTokenValidatation function starts an Observable timer. The application subscribes to the Observable which executes every 3 seconds. The id_token is validated, or more precise, checks that the id_token has not expired. If the token has expired and the silent_renew configuration has been activated, the RefreshSession function will be called, to get new tokens.

private runTokenValidatation() {
	let source = Observable.timer(3000, 3000)
		.timeInterval()
		.pluck('interval')
		.take(10000);

	let subscription = source.subscribe(() => {
		if (this._isAuthorized) {
			if (this.oidcSecurityValidation.IsTokenExpired(this.retrieve('authorizationDataIdToken'))) {
				console.log('IsAuthorized: isTokenExpired');

				if (this._configuration.silent_renew) {
					this.RefreshSession();
				} else {
					this.ResetAuthorizationData();
				}
			}
		}
	},
	function (err: any) {
		console.log('Error: ' + err);
	},
	function () {
		console.log('Completed');
	});
}

The RefreshSession function creates the required nonce and state which is used for the OpenID Implicit Flow validation and starts an authentication and authorization of the client application and the user.

public RefreshSession() {
        console.log('BEGIN refresh session Authorize');

        let nonce = 'N' + Math.random() + '' + Date.now();
        let state = Date.now() + '' + Math.random();

        this.store('authStateControl', state);
        this.store('authNonce', nonce);
        console.log('RefreshSession created. adding myautostate: ' + this.retrieve('authStateControl'));

        let url = this.createAuthorizeUrl(nonce, state);

        this._oidcSecuritySilentRenew.startRenew(url);
    }

The startRenew sets the iframe src to the url for the OpenID Connect flow. If successful, the id_token and the access_token are returned and the application runs without any interupt.

public startRenew(url: string) {
        this._sessionIframe.src = url;

        return new Promise((resolve) => {
            this._sessionIframe.onload = () => {
                resolve();
            }
        });
}

IdentityServer4 Implicit Flow configuration

The STS server, using IdentityServer4 implements the server side of the OpenID Implicit flow. The AccessTokenLifetime and the IdentityTokenLifetime properties are set to 30s and 10s. After 10s the id_token will expire and the client application will request new tokens. The access_token is valid for 30s, so that any client API requests will not fail. If you set these values to the same value, then the client will have to request new tokens before the id_token expires.

new Client
{
	ClientName = "angularclient",
	ClientId = "angularclient",
	AccessTokenType = AccessTokenType.Reference,
	AccessTokenLifetime = 30,
	IdentityTokenLifetime = 10,
	AllowedGrantTypes = GrantTypes.Implicit,
	AllowAccessTokensViaBrowser = true,
	RedirectUris = new List<string>
	{
		"https://localhost:44311"

	},
	PostLogoutRedirectUris = new List<string>
	{
		"https://localhost:44311/Unauthorized"
	},
	AllowedCorsOrigins = new List<string>
	{
		"https://localhost:44311",
		"http://localhost:44311"
	},
	AllowedScopes = new List<string>
	{
		"openid",
		"dataEventRecords",
		"dataeventrecordsscope",
		"securedFiles",
		"securedfilesscope",
		"role"
	}
}

When the application is run, the user can login, and the tokens are refreshed every ten seconds as configured on the server.

Links:

http://openid.net/specs/openid-connect-implicit-1_0.html

https://github.com/IdentityServer/IdentityServer4

https://identityserver4.readthedocs.io/en/release/


Using Protobuf Media Formatters with ASP.NET Core

$
0
0

Theis article shows how to use Protobuf with an ASP.NET Core MVC application. The API uses the WebApiContrib.Core.Formatter.Protobuf Nuget package to add support for Protobuf. This package uses the protobuf-net Nuget package from Marc Gravell, which makes it really easy to use a really fast serializer, deserializer for your APIs.

Code: https://github.com/damienbod/AspNetCoreWebApiContribProtobufSample

Setting up te ASP.NET Core MVC API

To use Protobuf with ASP.NET Core, the WebApiContrib.Core.Formatter.Protobuf Nuget package can be used in your project. You can add this using the Nuget manager in Visual Studio.

Or you can add it directly in your project file.

<PackageReference Include="WebApiContrib.Core.Formatter.Protobuf" Version="1.0.0" />

Now the formatters can be added in the Startup file.

public void ConfigureServices(IServiceCollection services)
{
	services.AddMvc()
		.AddProtobufFormatters();
}

A model now needs to be defined. The protobuf-net attributes are used to define the model class.

using ProtoBuf;

namespace Model
{
    [ProtoContract]
    public class Table
    {
        [ProtoMember(1)]
        public string Name {get;set;}

        [ProtoMember(2)]
        public string Description { get; set; }


        [ProtoMember(3)]
        public string Dimensions { get; set; }
    }
}

The ASP.NET Core MVC API can then be used with the Table class.

using System;
using System.Collections.Generic;
using System.Linq;
using System.Threading.Tasks;
using Microsoft.AspNetCore.Mvc;
using Model;

namespace AspNetCoreWebApiContribProtobufSample.Controllers
{
    [Route("api/[controller]")]
    public class TablesController : Controller
    {
        // GET api/tables
        [HttpGet]
        public IActionResult Get()
        {
            List<Table> tables = new List<Table>
            {
                new Table{Name= "jim", Dimensions="190x80x90", Description="top of the range from Migro"},
                new Table{Name= "jim large", Dimensions="220x100x90", Description="top of the range from Migro"}
            };

            return Ok(tables);
        }

        // GET api/values/5
        [HttpGet("{id}")]
        public IActionResult Get(int id)
        {
            var table = new Table { Name = "jim", Dimensions = "190x80x90", Description = "top of the range from Migro" };
            return Ok(table);
        }

        // POST api/values
        [HttpPost]
        public IActionResult Post([FromBody]Table value)
        {
            var got = value;
            return Created("api/tables", got);
        }
    }
}

Creating a simple Protobuf HttpClient

A HttpClient using the same Table class with the protobuf-net definitions can be used to access the API and request the data with “application/x-protobuf” header.

static async System.Threading.Tasks.Task<Table[]> CallServerAsync()
{
	var client = new HttpClient();

	var request = new HttpRequestMessage(HttpMethod.Get, "http://localhost:31004/api/tables");
	request.Headers.Accept.Add(new MediaTypeWithQualityHeaderValue("application/x-protobuf"));
	var result = await client.SendAsync(request);
	var tables = ProtoBuf.Serializer.Deserialize<Table[]>(await result.Content.ReadAsStreamAsync());
	return tables;
}

The data is returned in the response using Protobuf seriailzation.

If you want to post some data using Protobuf, you can serialize the data to Protobuf and post it to the server using the HttpClient. This example uses “application/x-protobuf”.

static async System.Threading.Tasks.Task<Table> PostStreamDataToServerAsync()
{
	HttpClient client = new HttpClient();
	client.DefaultRequestHeaders
		  .Accept
		  .Add(new MediaTypeWithQualityHeaderValue("application/x-protobuf"));

	HttpRequestMessage request = new HttpRequestMessage(HttpMethod.Post,
		"http://localhost:31004/api/tables");

	MemoryStream stream = new MemoryStream();
	ProtoBuf.Serializer.Serialize<Table>(stream, new Table
	{
		Name = "jim",
		Dimensions = "190x80x90",
		Description = "top of the range from Migro"
	});

	request.Content = new ByteArrayContent(stream.ToArray());

	// HTTP POST with Protobuf Request Body
	var responseForPost = client.SendAsync(request).Result;

	var resultData = ProtoBuf.Serializer.Deserialize<Table>(await responseForPost.Content.ReadAsStreamAsync());
	return resultData;
}

Links:

https://www.nuget.org/packages/WebApiContrib.Core.Formatter.Protobuf/

https://github.com/mgravell/protobuf-net


Adding an external Microsoft login to IdentityServer4

$
0
0

This article shows how to implement a Microsoft Account as an external provider in an IdentityServer4 project using ASP.NET Core Identity with a SQLite database.

Code https://github.com/damienbod/AspNetCoreID4External

Setting up the App Platform for the Microsoft Account

To setup the app, login using your Microsoft account and open the My Applications link

https://apps.dev.microsoft.com/?mkt=en-gb#/appList

Click the ‘Add an app’ button

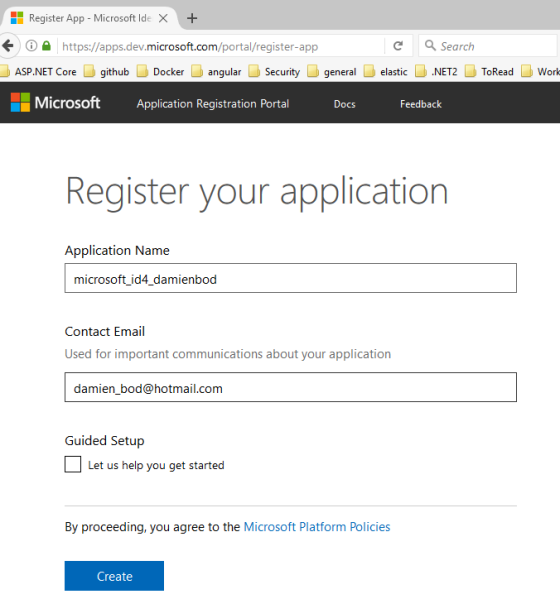
Give the application a name and add your email. This app is called ‘microsoft_id4_damienbod’

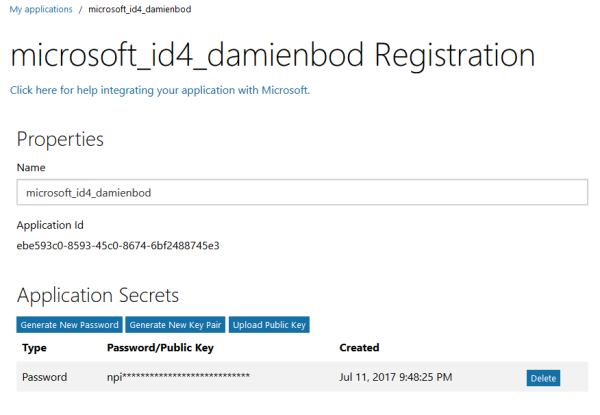
After you clicked the create button, you need to generate a new password. Save this somewhere for the application configuration. This will be the client secret when configuring the application.

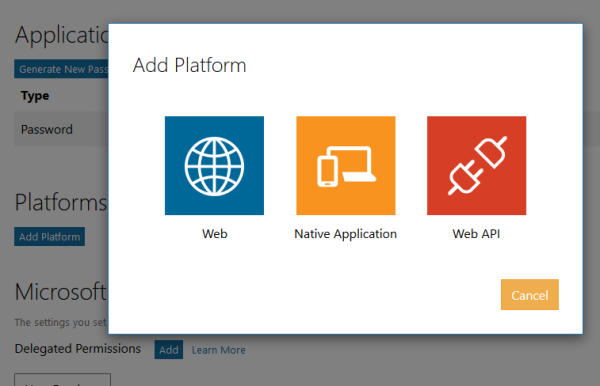
Now Add a new platform. Choose a Web type.

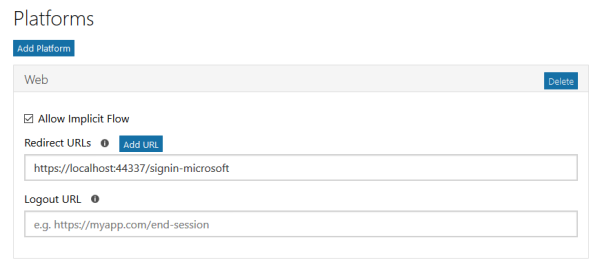
Now add the redirect URL for you application. This will be the https://YOUR_URL/signin-microsoft

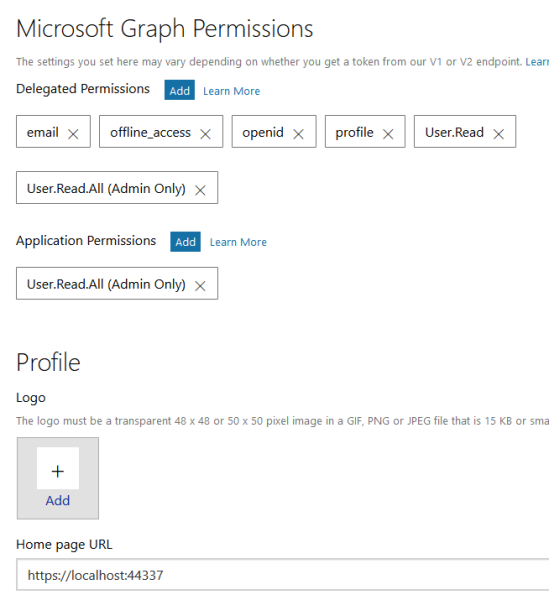
Add the permissions as required

Application configuration

Clone the IdentityServer4 samples and use the 6_AspNetIdentity project from the quickstarts.
Add the Microsoft.AspNetCore.Authentication.MicrosoftAccount package using Nuget as well as the ASP.NET Core Identity and EFCore packages required to the IdentityServer4 server project.

The application uses SQLite with Identity. This is configured in the Startup class in the ConfigureServices method.

services.AddDbContext<ApplicationDbContext>(options =>
  options.UseSqlite(Configuration.GetConnectionString("DefaultConnection")));

services.AddIdentity<ApplicationUser, IdentityRole>()
  .AddEntityFrameworkStores<ApplicationDbContext>()
  .AddDefaultTokenProviders();

Now the UseMicrosoftAccountAuthentication extension method can be use to add the Microsoft Account external provider middleware in the Configure method in the Startup class. The SignInScheme is set to “Identity.External” because the application is using ASP.NET Core Identity. The ClientId is the Id from the app ‘microsoft_id4_damienbod’ which was configured on the my applications website. The ClientSecret is the generated password.

app.UseIdentity();
app.UseIdentityServer();

app.UseMicrosoftAccountAuthentication(new MicrosoftAccountOptions
{
	AuthenticationScheme = "Microsoft",
	DisplayName = "Microsoft",
	SignInScheme = "Identity.External",
	ClientId = _clientId,
	ClientSecret = _clientSecret
});

The application can now be tested. An Angular client using OpenID Connect sends a login request to the server. The ClientId and the ClientSecret are saved using user secrets, so that the password is not committed in the src code.

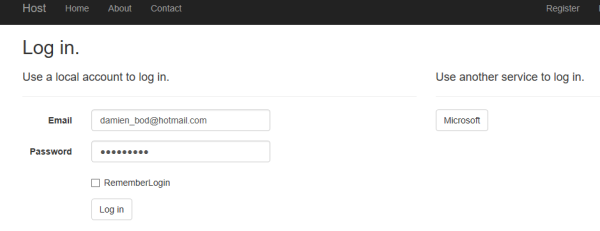
Click the Microsoft button to login.

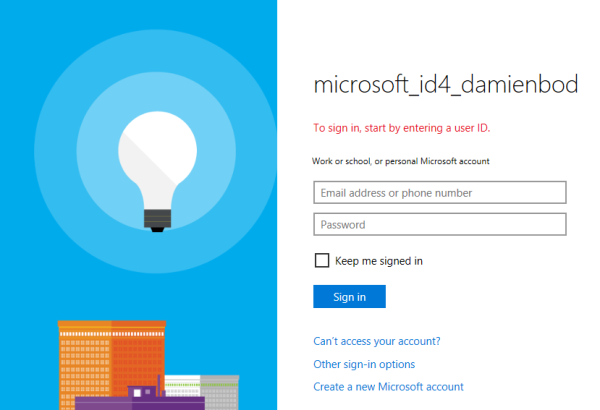
This redirects the user to the Microsoft Account login for the microsoft_id4_damienbod application.

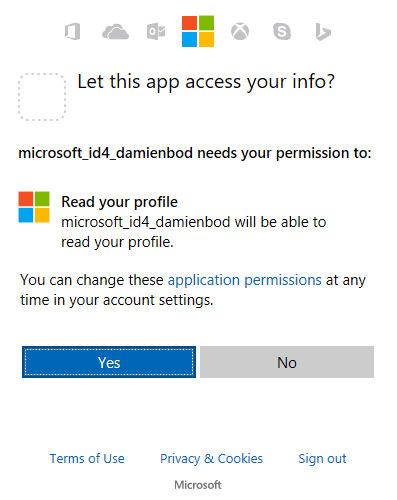
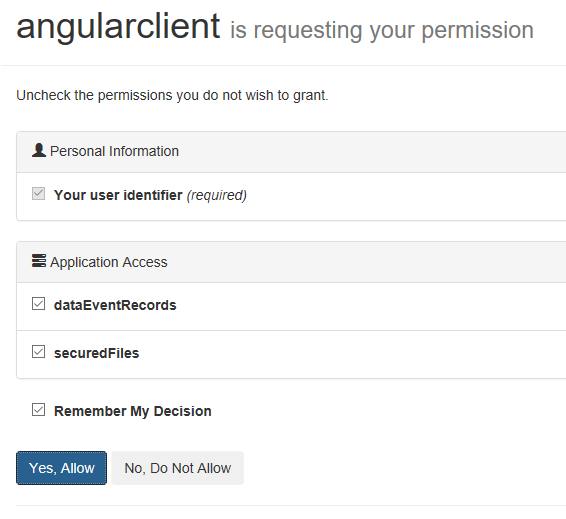
After a successful login, the user is redirected to the consent page.

Click yes, and the user is redirected back to the IdentityServer4 application. If it’s a new user, a register page will be opened.

Click register and the ID4 consent page is opened.

Then the application opens.

What’s nice about the IdentityServer4 application is that it’s a simple ASP.NET Core application with standard Views and Controllers. This makes it really easy to change the flow, for example, if a user is not allowed to register or whatever.

Links

https://docs.microsoft.com/en-us/azure/app-service-mobile/app-service-mobile-how-to-configure-microsoft-authentication

http://docs.identityserver.io/en/release/topics/signin_external_providers.html


Implementing Two-factor authentication with IdentityServer4 and Twilio

$
0
0

This article shows how to implement two factor authentication using Twilio and IdentityServer4 using Identity. On the Microsoft’s Two-factor authentication with SMS documentation, Twilio and ASPSMS are promoted, but any SMS provider can be used.

Code: https://github.com/damienbod/AspNetCoreID4External

Setting up Twilio

Create an account and login to https://www.twilio.com/

Now create a new phone number and use the Twilio documentation to set up your account to send SMS messages. You need the Account SID, Auth Token and the Phone number which are required in the application.

The phone number can be configured here:
https://www.twilio.com/console/phone-numbers/incoming

Adding the SMS support to IdentityServer4

Add the Twilio Nuget package to the IdentityServer4 project.

<PackageReference Include="Twilio" Version="5.5.2" />

The Twilio settings should be a secret, so these configuration properties are added to the app.settings.json file with dummy values. These can then be used for the deployments.

"TwilioSettings": {
  "Sid": "dummy",
  "Token": "dummy",
  "From": "dummy"
}

A configuration class is then created so that the settings can be added to the DI.

using System;
using System.Collections.Generic;
using System.Linq;
using System.Threading.Tasks;

namespace IdentityServerWithAspNetIdentity.Services
{
    public class TwilioSettings
    {
        public string Sid { get; set; }
        public string Token { get; set; }
        public string From { get; set; }
    }
}

Now the user secrets configuration needs to be setup on your dev PC. Right click the IdentityServer4 project and add the user secrets with the proper values which you can get from your Twilio account.

{
  "MicrosoftClientId": "your_secret..",
  "MircosoftClientSecret":  "your_secret..",
  "TwilioSettings": {
    "Sid": "your_secret..",
    "Token": "your_secret..",
    "From": "your_secret..",
  }
}

The configuration class is then added to the DI in the Startup class ConfigureServices method.

var twilioSettings = Configuration.GetSection("TwilioSettings");
services.Configure<TwilioSettings>(twilioSettings);

Now the TwilioSettings can be added to the AuthMessageSender class which is defined in the MessageServices file, if using the IdentityServer4 samples.

private readonly TwilioSettings _twilioSettings;

public AuthMessageSender(ILogger<AuthMessageSender> logger, IOptions<TwilioSettings> twilioSettings)
{
	_logger = logger;
	_twilioSettings = twilioSettings.Value;
}

This class is also added to the DI in the startup class.

services.AddTransient<ISmsSender, AuthMessageSender>();

Now the TwilioClient can be setup to send the SMS in the SendSmsAsync method.

public Task SendSmsAsync(string number, string message)
{
	// Plug in your SMS service here to send a text message.
	_logger.LogInformation("SMS: {number}, Message: {message}", number, message);
	var sid = _twilioSettings.Sid;
	var token = _twilioSettings.Token;
	var from = _twilioSettings.From;
	TwilioClient.Init(sid, token);
	MessageResource.CreateAsync(new PhoneNumber(number),
		from: new PhoneNumber(from),
		body: message);
	return Task.FromResult(0);
}

The SendCode.cshtml view can now be changed to send the SMS with the style, layout you prefer.

<form asp-controller="Account" asp-action="SendCode" asp-route-returnurl="@Model.ReturnUrl" method="post" class="form-horizontal">
    <input asp-for="RememberMe" type="hidden" />
    <input asp-for="SelectedProvider" type="hidden" value="Phone" />
    <input asp-for="ReturnUrl" type="hidden" value="@Model.ReturnUrl" />
    <div class="row">
        <div class="col-md-8">
            <button type="submit" class="btn btn-default">Send a verification code using SMS</button>
        </div>
    </div>
</form>

In the VerifyCode.cshtml, the ReturnUrl from the model property must be added to the form as a hidden item, otherwise your client will not be redirected back to the calling app.

<form asp-controller="Account" asp-action="VerifyCode" asp-route-returnurl="@ViewData["ReturnUrl"]" method="post" class="form-horizontal">
    <div asp-validation-summary="All" class="text-danger"></div>
    <input asp-for="Provider" type="hidden" />
    <input asp-for="RememberMe" type="hidden" />
    <input asp-for="ReturnUrl" type="hidden" value="@Model.ReturnUrl" />
    <h4>@ViewData["Status"]</h4>
    <hr />
    <div class="form-group">
        <label asp-for="Code" class="col-md-2 control-label"></label>
        <div class="col-md-10">
            <input asp-for="Code" class="form-control" />
            <span asp-validation-for="Code" class="text-danger"></span>
        </div>
    </div>
    <div class="form-group">
        <div class="col-md-offset-2 col-md-10">
            <div class="checkbox">
                <input asp-for="RememberBrowser" />
                <label asp-for="RememberBrowser"></label>
            </div>
        </div>
    </div>
    <div class="form-group">
        <div class="col-md-offset-2 col-md-10">
            <button type="submit" class="btn btn-default">Submit</button>
        </div>
    </div>
</form>

Testing the application

If using an existing client, you need to update the Identity in the database. Each user requires that the TwoFactoredEnabled field is set to true and a mobile phone needs to be set in the phone number field, (Or any phone which can accept SMS)

Now login with this user:

The user is redirected to the send SMS page. Click the send SMS button. This sends a SMS to the phone number defined in the Identity for the user trying to authenticate.

You should recieve an SMS. Enter the code in the verify view. If no SMS was sent, check your Twilio account logs.

After a successful code validation, the user is redirected back to the consent page for the client application. If not redirected, the return url was not set in the model.

Links:

https://docs.microsoft.com/en-us/aspnet/core/security/authentication/2fa

https://www.twilio.com/

http://docs.identityserver.io/en/release/

https://www.twilio.com/use-cases/two-factor-authentication


Angular Configuration using ASP.NET Core settings

$
0
0

This post shows how ASP.NET Core application settings can be used to configure an Angular application. ASP.NET Core provides excellent support for different configuration per environment, and so using this for an Angular application can be very useful. Using CI, one release build can be automatically created with different configurations, instead of different release builds per deployment target.

Code: https://github.com/damienbod/AspNet5IdentityServerAngularImplicitFlow/tree/master/src/AngularClient

ASP.NET Core Hosting application

The ClientAppSettings class is used to load the strongly typed appsettings.json from the json file. The class contains the properties required for OIDC configuration in the SPA and the required API URLs. These properties have different values per deployment, so we do not want to add these in a typescript file, or change with each build.

namespace AngularClient.ViewModel
{
    public class ClientAppSettings
    {
        public string  stsServer { get; set; }
        public string redirect_url { get; set; }
        public string client_id { get; set; }
        public string response_type { get; set; }
        public string scope { get; set; }
        public string post_logout_redirect_uri { get; set; }
        public bool start_checksession { get; set; }
        public bool silent_renew { get; set; }
        public string startup_route { get; set; }
        public string forbidden_route { get; set; }
        public string unauthorized_route { get; set; }
        public bool log_console_warning_active { get; set; }
        public bool log_console_debug_active { get; set; }
        public string max_id_token_iat_offset_allowed_in_seconds { get; set; }
        public string apiServer { get; set; }
        public string apiFileServer { get; set; }
    }
}

The appsettings.json file contains the actual values which will be used for each different environment.

{
  "ClientAppSettings": {
    "stsServer": "https://localhost:44318",
    "redirect_url": "https://localhost:44311",
    "client_id": "angularclient",
    "response_type": "id_token token",
    "scope": "dataEventRecords securedFiles openid profile",
    "post_logout_redirect_uri": "https://localhost:44311",
    "start_checksession": false,
    "silent_renew": false,
    "startup_route": "/dataeventrecords",
    "forbidden_route": "/forbidden",
    "unauthorized_route": "/unauthorized",
    "log_console_warning_active": true,
    "log_console_debug_active": true,
    "max_id_token_iat_offset_allowed_in_seconds": 10,
    "apiServer": "https://localhost:44390/",
    "apiFileServer": "https://localhost:44378/"
  }
}

The ClientAppSettings class is then added to the IoC in the ASP.NET Core Startup class and the ClientAppSettings section is used to fill the instance with data.

public void ConfigureServices(IServiceCollection services)
{
  services.Configure<ClientAppSettings>(Configuration.GetSection("ClientAppSettings"));
  services.AddMvc();

A MVC Controller is used to make the settings public. This class gets the strongly typed settings from the IoC and returns it in a HTTP GET request. No application secrets should be included in this HTTP GET request!

using AngularClient.ViewModel;
using Microsoft.AspNetCore.Mvc;
using Microsoft.Extensions.Options;

namespace AngularClient.Controllers
{
    [Route("api/[controller]")]
    public class ClientAppSettingsController : Controller
    {
        private readonly ClientAppSettings _clientAppSettings;

        public ClientAppSettingsController(IOptions<ClientAppSettings> clientAppSettings)
        {
            _clientAppSettings = clientAppSettings.Value;
        }

        [HttpGet]
        public IActionResult Get()
        {
            return Ok(_clientAppSettings);
        }
    }
}

Configuring the Angular application

The Angular application needs to read the settings and use these in the client application. A configClient function is used to GET the data from the server. The APP_INITIALIZER could also be used, but as the settings are been used in the main AppModule, you still have to wait for the HTTP GET request to complete.

configClient() {

	// console.log('window.location', window.location);
	// console.log('window.location.href', window.location.href);
	// console.log('window.location.origin', window.location.origin);

	return this.http.get(window.location.origin + window.location.pathname + '/api/ClientAppSettings').map(res => {
		this.clientConfiguration = res.json();
	});
}

In the constructor of the AppModule, the module subscribes to the configClient function. Here the configuration values are read and the properties are set as required for the SPA application.

clientConfiguration: any;

constructor(public oidcSecurityService: OidcSecurityService, private http: Http, private configuration: Configuration) {

	console.log('APP STARTING');
	this.configClient().subscribe(config => {

		let openIDImplicitFlowConfiguration = new OpenIDImplicitFlowConfiguration();
		openIDImplicitFlowConfiguration.stsServer = this.clientConfiguration.stsServer;
		openIDImplicitFlowConfiguration.redirect_url = this.clientConfiguration.redirect_url;
		openIDImplicitFlowConfiguration.client_id = this.clientConfiguration.client_id;
		openIDImplicitFlowConfiguration.response_type = this.clientConfiguration.response_type;
		openIDImplicitFlowConfiguration.scope = this.clientConfiguration.scope;
		openIDImplicitFlowConfiguration.post_logout_redirect_uri = this.clientConfiguration.post_logout_redirect_uri;
		openIDImplicitFlowConfiguration.start_checksession = this.clientConfiguration.start_checksession;
		openIDImplicitFlowConfiguration.silent_renew = this.clientConfiguration.silent_renew;
		openIDImplicitFlowConfiguration.startup_route = this.clientConfiguration.startup_route;
		openIDImplicitFlowConfiguration.forbidden_route = this.clientConfiguration.forbidden_route;
		openIDImplicitFlowConfiguration.unauthorized_route = this.clientConfiguration.unauthorized_route;
		openIDImplicitFlowConfiguration.log_console_warning_active = this.clientConfiguration.log_console_warning_active;
		openIDImplicitFlowConfiguration.log_console_debug_active = this.clientConfiguration.log_console_debug_active;
		openIDImplicitFlowConfiguration.max_id_token_iat_offset_allowed_in_seconds = this.clientConfiguration.max_id_token_iat_offset_allowed_in_seconds;

		this.oidcSecurityService.setupModule(openIDImplicitFlowConfiguration);

		configuration.FileServer = this.clientConfiguration.apiFileServer;
		configuration.Server = this.clientConfiguration.apiServer;
	});
}

The Configuration class can then be used throughout the SPA application.

import { Injectable } from '@angular/core';

@Injectable()
export class Configuration {
    public Server = 'read from app settings';
    public FileServer = 'read from app settings';
}

I am certain, there is a better way to do the Angular configuration, but not much information exists for this. APP_INITIALIZER is not so well documentated. Angular CLI has it’s own solution, but the configuration file cannot be read per environment.

Links:

https://docs.microsoft.com/en-us/aspnet/core/fundamentals/configuration

https://docs.microsoft.com/en-us/aspnet/core/fundamentals/environments

https://www.intertech.com/Blog/deploying-angular-4-apps-with-environment-specific-info/

https://stackoverflow.com/questions/43193049/app-settings-the-angular-4-way

https://damienbod.com/2015/10/11/asp-net-5-multiple-configurations-without-using-environment-variables/


Sending Direct Messages using SignalR with ASP.NET core and Angular

$
0
0

This article shows how SignalR could be used to send direct messages between different clients using ASP.NET Core to host the SignalR Hub and Angular to implement the clients.

Code: https://github.com/damienbod/AspNetCoreAngularSignalRSecurity

Posts in this series

History

2018-03-15 Updated signalr Microsoft.AspNetCore.SignalR 1.0.0-preview1-final, Angular 5.2.8, @aspnet/signalr 1.0.0-preview1-update1

When the application is started, different clients can log in using an email, if already registered, and can send direct messages from one SignalR client to the other SignalR client using the email of the user which was used to sign in. All messages are sent using a JWT token which is used to validate the identity.

The latest Microsoft.AspNetCore.SignalR Nuget package can be added to the ASP.NET Core project in the csproj file, or by using the Visual Studio Nuget package manager to add the package.

<PackageReference Include="Microsoft.AspNetCore.SignalR" Version="1.0.0-preview1-final" />

A single SignalR Hub is used to add the logic to send the direct messages between the clients. The Hub is protected using the bearer token authentication scheme which is defined in the Authorize filter. A client can leave or join using the Context.User.Identity.Name, which is configured to use the email of the Identity. When the user joins, the connectionId is saved to the in-memory database, which can then be used to send the direct messages. All other online clients are sent a message, with the new user data. The actual client is sent the complete list of existing clients.

using Microsoft.AspNetCore.Authorization;
using Microsoft.AspNetCore.SignalR;
using System.Collections.Generic;
using System.Linq;
using System.Threading.Tasks;

namespace ApiServer.SignalRHubs
{
    [Authorize(AuthenticationSchemes = "Bearer")]
    public class UsersDmHub : Hub
    {
        private UserInfoInMemory _userInfoInMemory;

        public UsersDmHub(UserInfoInMemory userInfoInMemory)
        {
            _userInfoInMemory = userInfoInMemory;
        }

        public async Task Leave()
        {
            _userInfoInMemory.Remove(Context.User.Identity.Name);
            await Clients.AllExcept(new List<string> { Context.ConnectionId }).SendAsync(
                   "UserLeft",
                   Context.User.Identity.Name
                   );
        }

        public async Task Join()
        {
            if (!_userInfoInMemory.AddUpdate(Context.User.Identity.Name, Context.ConnectionId))
            {
                // new user

                var list = _userInfoInMemory.GetAllUsersExceptThis(Context.User.Identity.Name).ToList();
                await Clients.AllExcept(new List<string> { Context.ConnectionId }).SendAsync(
                    "NewOnlineUser",
                    _userInfoInMemory.GetUserInfo(Context.User.Identity.Name)
                    );
            }
            else
            {
                // existing user joined again
                
            }

            await Clients.Client(Context.ConnectionId).SendAsync(
                "Joined",
                _userInfoInMemory.GetUserInfo(Context.User.Identity.Name)
                );

            await Clients.Client(Context.ConnectionId).SendAsync(
                "OnlineUsers",
                _userInfoInMemory.GetAllUsersExceptThis(Context.User.Identity.Name)
            );
        }

        public Task SendDirectMessage(string message, string targetUserName)
        {
            var userInfoSender = _userInfoInMemory.GetUserInfo(Context.User.Identity.Name);
            var userInfoReciever = _userInfoInMemory.GetUserInfo(targetUserName);
            return Clients.Client(userInfoReciever.ConnectionId).SendAsync("SendDM", message, userInfoSender);
        }
    }
}

The UserInfoInMemory is used as an in-memory database, which is nothing more than a ConcurrentDictionary to manage the online users.

System.Collections.Concurrent;
using System.Collections.Generic;
using System.Linq;

namespace ApiServer.SignalRHubs
{
    public class UserInfoInMemory
    {
        private ConcurrentDictionary<string, UserInfo> _onlineUser { get; set; } = new ConcurrentDictionary<string, UserInfo>();

        public bool AddUpdate(string name, string connectionId)
        {
            var userAlreadyExists = _onlineUser.ContainsKey(name);

            var userInfo = new UserInfo
            {
                UserName = name,
                ConnectionId = connectionId
            };

            _onlineUser.AddOrUpdate(name, userInfo, (key, value) => userInfo);

            return userAlreadyExists;
        }

        public void Remove(string name)
        {
            UserInfo userInfo;
            _onlineUser.TryRemove(name, out userInfo);
        }

        public IEnumerable<UserInfo> GetAllUsersExceptThis(string username)
        {
            return _onlineUser.Values.Where(item => item.UserName != username);
        }

        public UserInfo GetUserInfo(string username)
        {
            UserInfo user;
            _onlineUser.TryGetValue(username, out user);
            return user;
        }
    }
}

The UserInfo class is used to save the ConnectionId from the SignalR Hub, and the user name.

namespace ApiServer.SignalRHubs
{
    public class UserInfo
    {
        public string ConnectionId { get; set; }
        public string UserName { get; set; }
    }
}

The JWT Bearer token is configured in the startup class, to read the token from the URL parameters.

var tokenValidationParameters = new TokenValidationParameters()
{
	ValidIssuer = "https://localhost:44318/",
	ValidAudience = "dataEventRecords",
	IssuerSigningKey = new SymmetricSecurityKey(Encoding.UTF8.GetBytes("dataEventRecordsSecret")),
	NameClaimType = "name",
	RoleClaimType = "role", 
};

var jwtSecurityTokenHandler = new JwtSecurityTokenHandler
{
	InboundClaimTypeMap = new Dictionary<string, string>()
};

services.AddAuthentication(IdentityServerAuthenticationDefaults.AuthenticationScheme)
.AddJwtBearer(options =>
{
	options.Authority = "https://localhost:44318/";
	options.Audience = "dataEventRecords";
	options.IncludeErrorDetails = true;
	options.SaveToken = true;
	options.SecurityTokenValidators.Clear();
	options.SecurityTokenValidators.Add(jwtSecurityTokenHandler);
	options.TokenValidationParameters = tokenValidationParameters;
	options.Events = new JwtBearerEvents
	{
		OnMessageReceived = context =>
		{
			if ( (context.Request.Path.Value.StartsWith("/loo")) || (context.Request.Path.Value.StartsWith("/usersdm")) 
				&& context.Request.Query.TryGetValue("token", out StringValues token)
			)
			{
				context.Token = token;
			}

			return Task.CompletedTask;
		},
		OnAuthenticationFailed = context =>
		{
			var te = context.Exception;
			return Task.CompletedTask;
		}
	};
});

Angular SignalR Client

The Angular SignalR client is implemented using the npm package “@aspnet/signalr-client”: “1.0.0-alpha2-final”

A ngrx store is used to manage the states sent, received from the API. All SiganlR messages are sent using the DirectMessagesService Angular service. This service is called from the ngrx effects, or sends the received information to the reducer of the ngrx store.

import 'rxjs/add/operator/map';
import { Subscription } from 'rxjs/Subscription';

import { HttpHeaders } from '@angular/common/http';
import { Injectable } from '@angular/core';

import { HubConnection } from '@aspnet/signalr';
import { Store } from '@ngrx/store';
import * as directMessagesActions from './store/directmessages.action';
import { OidcSecurityService } from 'angular-auth-oidc-client';
import { OnlineUser } from './models/online-user';

@Injectable()
export class DirectMessagesService {

    private _hubConnection: HubConnection;
    private headers: HttpHeaders;

    isAuthorizedSubscription: Subscription;
    isAuthorized: boolean;

    constructor(
        private store: Store<any>,
        private oidcSecurityService: OidcSecurityService
    ) {
        this.headers = new HttpHeaders();
        this.headers = this.headers.set('Content-Type', 'application/json');
        this.headers = this.headers.set('Accept', 'application/json');

        this.init();
    }

    sendDirectMessage(message: string, userId: string): string {

        this._hubConnection.invoke('SendDirectMessage', message, userId);
        return message;
    }

    leave(): void {
        this._hubConnection.invoke('Leave');
    }

    join(): void {
        this._hubConnection.invoke('Join');
    }

    private init() {
        this.isAuthorizedSubscription = this.oidcSecurityService.getIsAuthorized().subscribe(
            (isAuthorized: boolean) => {
                this.isAuthorized = isAuthorized;
                if (this.isAuthorized) {
                    this.initHub();
                }
            });
        console.log('IsAuthorized:' + this.isAuthorized);
    }

    private initHub() {
        console.log('initHub');
        const token = this.oidcSecurityService.getToken();
        let tokenValue = '';
        if (token !== '') {
            tokenValue = '?token=' + token;
        }
        const url = 'https://localhost:44390/';
        this._hubConnection = new HubConnection(`${url}usersdm${tokenValue}`);

        this._hubConnection.on('NewOnlineUser', (onlineUser: OnlineUser) => {
            console.log('NewOnlineUser received');
            console.log(onlineUser);
            this.store.dispatch(new directMessagesActions.ReceivedNewOnlineUser(onlineUser));
        });

        this._hubConnection.on('OnlineUsers', (onlineUsers: OnlineUser[]) => {
            console.log('OnlineUsers received');
            console.log(onlineUsers);
            this.store.dispatch(new directMessagesActions.ReceivedOnlineUsers(onlineUsers));
        });

        this._hubConnection.on('Joined', (onlineUser: OnlineUser) => {
            console.log('Joined received');
            this.store.dispatch(new directMessagesActions.JoinSent());
            console.log(onlineUser);
        });

        this._hubConnection.on('SendDM', (message: string, onlineUser: OnlineUser) => {
            console.log('SendDM received');
            this.store.dispatch(new directMessagesActions.ReceivedDirectMessage(message, onlineUser));
        });

        this._hubConnection.on('UserLeft', (name: string) => {
            console.log('UserLeft received');
            this.store.dispatch(new directMessagesActions.ReceivedUserLeft(name));
        });

        this._hubConnection.start()
            .then(() => {
                console.log('Hub connection started')
                this._hubConnection.invoke('Join');
            })
            .catch(() => {
                console.log('Error while establishing connection')
            });
    }

}

The DirectMessagesComponent is used to display the data, or send the events to the ngrx store, which in turn, sends the data to the SignalR server.

import { Component, OnInit, OnDestroy } from '@angular/core';
import { Subscription } from 'rxjs/Subscription';
import { Store } from '@ngrx/store';
import { DirectMessagesState } from '../store/directmessages.state';
import * as directMessagesAction from '../store/directmessages.action';
import { OidcSecurityService } from 'angular-auth-oidc-client';
import { OnlineUser } from '../models/online-user';
import { DirectMessage } from '../models/direct-message';
import { Observable } from 'rxjs/Observable';

@Component({
    selector: 'app-direct-message-component',
    templateUrl: './direct-message.component.html'
})

export class DirectMessagesComponent implements OnInit, OnDestroy {
    public async: any;
    onlineUsers: OnlineUser[];
    onlineUser: OnlineUser;
    directMessages: DirectMessage[];
    selectedOnlineUserName = '';
    dmState$: Observable<DirectMessagesState>;
    dmStateSubscription: Subscription;
    isAuthorizedSubscription: Subscription;
    isAuthorized: boolean;
    connected: boolean;
    message = '';

    constructor(
        private store: Store<any>,
        private oidcSecurityService: OidcSecurityService
    ) {
        this.dmState$ = this.store.select<DirectMessagesState>(state => state.dm.dm);
        this.dmStateSubscription = this.store.select<DirectMessagesState>(state => state.dm.dm)
            .subscribe((o: DirectMessagesState) => {
                this.connected = o.connected;
            });

    }

    public sendDm(): void {
        this.store.dispatch(new directMessagesAction.SendDirectMessageAction(this.message, this.onlineUser.userName));
    }

    ngOnInit() {
        this.isAuthorizedSubscription = this.oidcSecurityService.getIsAuthorized().subscribe(
            (isAuthorized: boolean) => {
                this.isAuthorized = isAuthorized;
                if (this.isAuthorized) {
                }
            });
        console.log('IsAuthorized:' + this.isAuthorized);
    }

    ngOnDestroy(): void {
        this.isAuthorizedSubscription.unsubscribe();
        this.dmStateSubscription.unsubscribe();
    }

    selectChat(onlineuserUserName: string): void {
        this.selectedOnlineUserName = onlineuserUserName
    }

    sendMessage() {
        console.log('send message to:' + this.selectedOnlineUserName + ':' + this.message);
        this.store.dispatch(new directMessagesAction.SendDirectMessageAction(this.message, this.selectedOnlineUserName));
    }

    getUserInfoName(directMessage: DirectMessage) {
        if (directMessage.fromOnlineUser) {
            return directMessage.fromOnlineUser.userName;
        }

        return '';
    }

    disconnect() {
        this.store.dispatch(new directMessagesAction.Leave());
    }

    connect() {
        this.store.dispatch(new directMessagesAction.Join());
    }
}

The Angular HTML template displays the data using Angular material.

<div class="full-width" *ngIf="isAuthorized">
    <div class="left-navigation-container" >
        <nav>

            <mat-list>
                <mat-list-item *ngFor="let onlineuser of (dmState$|async)?.onlineUsers">
                    <a mat-button (click)="selectChat(onlineuser.userName)">{{onlineuser.userName}}</a>
                </mat-list-item>
            </mat-list>

        </nav>
    </div>
    <div class="column-container content-container">
        <div class="row-container info-bar">
            <h3 style="padding-left: 20px;">{{selectedOnlineUserName}}</h3>
            <a mat-button (click)="sendMessage()" *ngIf="connected && selectedOnlineUserName && selectedOnlineUserName !=='' && message !==''">SEND</a>
            <a mat-button (click)="disconnect()" *ngIf="connected">Disconnect</a>
            <a mat-button (click)="connect()" *ngIf="!connected">Connect</a>
        </div>

        <div class="content" *ngIf="selectedOnlineUserName && selectedOnlineUserName !==''">

            <mat-form-field  style="width:95%">
                <textarea matInput placeholder="your message" [(ngModel)]="message" matTextareaAutosize matAutosizeMinRows="2"
                          matAutosizeMaxRows="5"></textarea>
            </mat-form-field>
           
            <mat-chip-list class="mat-chip-list-stacked">
                <ng-container *ngFor="let directMessage of (dmState$|async)?.directMessages">

                    <ng-container *ngIf="getUserInfoName(directMessage) !== ''">
                        <mat-chip selected="true" style="width:95%">
                            {{getUserInfoName(directMessage)}} {{directMessage.message}}
                        </mat-chip>
                    </ng-container>
                       
                    <ng-container *ngIf="getUserInfoName(directMessage) === ''">
                        <mat-chip style="width:95%">
                            {{getUserInfoName(directMessage)}} {{directMessage.message}}
                        </mat-chip>
                    </ng-container>

                    </ng-container>
            </mat-chip-list>

        </div>
    </div>
</div>

Links

https://github.com/aspnet/SignalR

https://github.com/aspnet/SignalR#readme

https://github.com/ngrx

https://www.npmjs.com/package/@aspnet/signalr-client

https://dotnet.myget.org/F/aspnetcore-ci-dev/api/v3/index.json

https://dotnet.myget.org/F/aspnetcore-ci-dev/npm/

https://dotnet.myget.org/feed/aspnetcore-ci-dev/package/npm/@aspnet/signalr-client

https://www.npmjs.com/package/msgpack5

Securing an ASP.NET Core MVC application which uses a secure API

$
0
0

The article shows how an ASP.NET Core MVC application can implement security when using an API to retrieve data. The OpenID Connect Hybrid flow is used to secure the ASP.NET Core MVC application. The application uses tokens stored in a cookie. This cookie is not used to access the API. The API is protected using a bearer token.

To access the API, the code running on the server of the ASP.NET Core MVC application, implements the OAuth2 client credentials resource owner flow to get the access token for the API and can then return the data to the razor views.

Code: https://github.com/damienbod/AspNetCoreHybridFlowWithApi

Setup

IdentityServer4 and OpenID connect flow configuration

Two client configurations are setup in the IdentityServer4 configuration class. The OpenID Connect Hybrid Flow client is used for the ASP.NET Core MVC application. This flow, after a successful login, will return a cookie to the client part of the application which contains the tokens. The second client is used for the API. This is a service to service communication between two trusted applications. This usually happens in a protected zone. The client API uses a secret to connect to the API. The secret should be a secret and different for each deployment.

public static IEnumerable<Client> GetClients()
{
	return new List<Client>
	{
		new Client
		{
			ClientName = "hybridclient",
			ClientId = "hybridclient",
			ClientSecrets = {new Secret("hybrid_flow_secret".Sha256()) },
			AllowedGrantTypes = GrantTypes.Hybrid,
			AllowOfflineAccess = true,
			RedirectUris = { "https://localhost:44329/signin-oidc" },
			PostLogoutRedirectUris = { "https://localhost:44329/signout-callback-oidc" },
			AllowedCorsOrigins = new List<string>
			{
				"https://localhost:44329/"
			},
			AllowedScopes = new List<string>
			{
				IdentityServerConstants.StandardScopes.OpenId,
				IdentityServerConstants.StandardScopes.Profile,
				IdentityServerConstants.StandardScopes.OfflineAccess,
				"scope_used_for_hybrid_flow",
				"role"
			}
		},
		new Client
		{
			ClientId = "ProtectedApi",
			ClientName = "ProtectedApi",
			ClientSecrets = new List<Secret> { new Secret { Value = "api_in_protected_zone_secret".Sha256() } },
			AllowedGrantTypes = GrantTypes.ClientCredentials,
			AllowedScopes = new List<string> { "scope_used_for_api_in_protected_zone" }
		}
	};
}

The GetApiResources defines the scopes and the APIs for the different resources. I usually define one scope per API resource.

public static IEnumerable<ApiResource> GetApiResources()
{
	return new List<ApiResource>
	{
		new ApiResource("scope_used_for_hybrid_flow")
		{
			ApiSecrets =
			{
				new Secret("hybrid_flow_secret".Sha256())
			},
			Scopes =
			{
				new Scope
				{
					Name = "scope_used_for_hybrid_flow",
					DisplayName = "Scope for the scope_used_for_hybrid_flow ApiResource"
				}
			},
			UserClaims = { "role", "admin", "user", "some_api" }
		},
		new ApiResource("ProtectedApi")
		{
			DisplayName = "API protected",
			ApiSecrets =
			{
				new Secret("api_in_protected_zone_secret".Sha256())
			},
			Scopes =
			{
				new Scope
				{
					Name = "scope_used_for_api_in_protected_zone",
					ShowInDiscoveryDocument = false
				}
			},
			UserClaims = { "role", "admin", "user", "safe_zone_api" }
		}
	};
}

Securing the Resource API

The protected API uses the IdentityServer4.AccessTokenValidation Nuget package to validate the access token. This uses the introspection endpoint to validate the token. The scope is also validated in this example using authorization policies from ASP.NET Core.

public void ConfigureServices(IServiceCollection services)
{
	services.AddAuthentication(IdentityServerAuthenticationDefaults.AuthenticationScheme)
	  .AddIdentityServerAuthentication(options =>
	  {
		  options.Authority = "https://localhost:44352";
		  options.ApiName = "ProtectedApi";
		  options.ApiSecret = "api_in_protected_zone_secret";
		  options.RequireHttpsMetadata = true;
	  });

	services.AddAuthorization(options =>
		options.AddPolicy("protectedScope", policy =>
		{
			policy.RequireClaim("scope", "scope_used_for_api_in_protected_zone");
		})
	);

	services.AddMvc();
}

The API is protected using the Authorize attribute and checks the defined policy. If this is ok, the data can be returned to the server part of the MVC application.

[Authorize(Policy = "protectedScope")]
[Route("api/[controller]")]
public class ValuesController : Controller
{
	[HttpGet]
	public IEnumerable<string> Get()
	{
		return new string[] { "data 1 from the second api", "data 2 from the second api" };
	}
}

Securing the ASP.NET Core MVC application

The ASP.NET Core MVC application uses OpenID Connect to validate the user and the application and saves the result in a cookie. If the identity is ok, the tokens are returned in the cookie from the server side of the application. See the OpenID Connect specification, for more information concerning the OpenID Connect Hybrid flow.

public void ConfigureServices(IServiceCollection services)
{
	services.AddAuthentication(options =>
	{
		options.DefaultScheme = CookieAuthenticationDefaults.AuthenticationScheme;
		options.DefaultChallengeScheme = OpenIdConnectDefaults.AuthenticationScheme;
	})
	.AddCookie()
	.AddOpenIdConnect(options =>
	{
		options.SignInScheme = "Cookies";
		options.Authority = "https://localhost:44352";
		options.RequireHttpsMetadata = true;
		options.ClientId = "hybridclient";
		options.ClientSecret = "hybrid_flow_secret";
		options.ResponseType = "code id_token";
		options.Scope.Add("scope_used_for_hybrid_flow");
		options.Scope.Add("profile");
		options.SaveTokens = true;
	});

	services.AddAuthorization();

	services.AddMvc();
}

The Configure method adds the authentication to the MVC middleware using the UseAuthentication extension method.

public void Configure(IApplicationBuilder app, IHostingEnvironment env, ILoggerFactory loggerFactory)
{
	...

	app.UseStaticFiles();

	app.UseAuthentication();

	app.UseMvc(routes =>
	{
		routes.MapRoute(
			name: "default",
			template: "{controller=Home}/{action=Index}/{id?}");
	});
}

The home controller is protected using the authorize attribute, and the index method gets the data from the API using the api service.

[Authorize]
public class HomeController : Controller
{
	private readonly ApiService _apiService;

	public HomeController(ApiService apiService)
	{
		_apiService = apiService;
	}

	public async System.Threading.Tasks.Task<IActionResult> Index()
	{
		var result = await _apiService.GetApiDataAsync();

		ViewData["data"] = result.ToString();
		return View();
	}

	public IActionResult Error()
	{
		return View(new ErrorViewModel { RequestId = Activity.Current?.Id ?? HttpContext.TraceIdentifier });
	}
}

Calling the protected API from the ASP.NET Core MVC app

The API service implements the HTTP request using the TokenClient from IdentiyModel. This can be downloaded as a Nuget package. First the access token is acquired from the server, then the token is used to request the data from the API.

var discoClient = new DiscoveryClient("https://localhost:44352");
var disco = await discoClient.GetAsync();
if (disco.IsError)
{
	throw new ApplicationException($"Status code: {disco.IsError}, Error: {disco.Error}");
}

var tokenClient = new TokenClient(disco.TokenEndpoint, "ProtectedApi", "api_in_protected_zone_secret");
var tokenResponse = await tokenClient.RequestClientCredentialsAsync("scope_used_for_api_in_protected_zone");

if (tokenResponse.IsError)
{
	throw new ApplicationException($"Status code: {tokenResponse.IsError}, Error: {tokenResponse.Error}");
}

using (var client = new HttpClient())
{
	client.BaseAddress = new Uri("https://localhost:44342");
	client.SetBearerToken(tokenResponse.AccessToken);

	var response = await client.GetAsync("/api/values");
	if (response.IsSuccessStatusCode)
	{
		var responseContent = await response.Content.ReadAsStringAsync();
		var data = JArray.Parse(responseContent);

		return data;
	}

	throw new ApplicationException($"Status code: {response.StatusCode}, Error: {response.ReasonPhrase}");
}

Authentication and Authorization in the API

The ASP.NET Core MVC application calls the API using a service to service trusted association in the protected zone. Due to this, the identity which made the original request cannot be validated using the access token on the API. If authorization is required for the original identity, this should be sent in the URL of the API HTTP request, which can then be validated as required using an authorization filter. Maybe it is enough to validate that the service token is authenticated, and authorized. Care should be taken when sending user data, GDPR requirements, or user information which the IT admins should not have access to.

Should I use the same token as the access token returned to the MVC client?

This depends 🙂 If the API is a public API, then this is fine, if you have no problem re-using the same token for different applications. If the API is in the protected zone, for example behind a WAF, then a separate token would be better. Only tokens issued for the trusted app can be used to access the protected API. This can be validated by using separate scopes, secrets, etc. The tokens issued for the MVC app and the user, will not work, these were issued for a single purpose only, and not multiple applications. The token used for the protected API never leaves the trusted zone.

Links

https://docs.microsoft.com/en-gb/aspnet/core/mvc/overview

https://docs.microsoft.com/en-gb/aspnet/core/security/anti-request-forgery

https://docs.microsoft.com/en-gb/aspnet/core/security/

http://openid.net/

https://www.owasp.org/images/b/b0/Best_Practices_WAF_v105.en.pdf

https://tools.ietf.org/html/rfc7662

http://docs.identityserver.io/en/release/quickstarts/5_hybrid_and_api_access.html

https://github.com/aspnet/Security

https://elanderson.net/2017/07/identity-server-from-implicit-to-hybrid-flow/

http://openid.net/specs/openid-connect-core-1_0.html#HybridFlowAuth


Using an EF Core database for the IdentityServer4 configuration data

$
0
0

This article shows how to implement a database store for the IdentityServer4 configurations for the Client, ApiResource and IdentityResource settings using Entity Framework Core and SQLite. This could be used, if you need to create clients, or resources dynamically for the STS, or if you need to deploy the STS to multiple instances, for example using Service Fabric. To make it scalable, you need to remove all session data, and configuration data from the STS instances and share this in a shared resource, otherwise you can run it only smoothly as a single instance.

Information about IdentityServer4 deployment can be found here:
http://docs.identityserver.io/en/release/topics/deployment.html

Code: https://github.com/damienbod/AspNetCoreIdentityServer4Persistence

Implementing the IClientStore

By implementing the IClientStore, you can load your STS client data from anywhere you want. This example uses an Entity Framework Core Context, to load the data from a SQLite database.

using IdentityServer4.Models;
using IdentityServer4.Stores;
using Microsoft.Extensions.Logging;
using System;
using System.Linq;
using System.Threading.Tasks;

namespace AspNetCoreIdentityServer4Persistence.ConfigurationStore
{
    public class ClientStore : IClientStore
    {
        private readonly ConfigurationStoreContext _context;
        private readonly ILogger _logger;

        public ClientStore(ConfigurationStoreContext context, ILoggerFactory loggerFactory)
        {
            _context = context;
            _logger = loggerFactory.CreateLogger("ClientStore");
        }

        public Task<Client> FindClientByIdAsync(string clientId)
        {
            var client = _context.Clients.First(t => t.ClientId == clientId);
            client.MapDataFromEntity();
            return Task.FromResult(client.Client);
        }
    }
}

The ClientEntity is used to save or retrieve the data from the database. Because the IdentityServer4 class cannot be saved directly using Entity Framework Core, a wrapper class is used which saves the Client object as a Json string. The entity class implements helper methods, which parses the Json string to/from the type Client class, which is used by Identityserver4.

using IdentityServer4.Models;
using Newtonsoft.Json;
using System;
using System.Collections.Generic;
using System.ComponentModel.DataAnnotations;
using System.ComponentModel.DataAnnotations.Schema;
using System.Linq;
using System.Threading.Tasks;

namespace AspNetCoreIdentityServer4Persistence.ConfigurationStore
{
    public class ClientEntity
    {
        public string ClientData { get; set; }

        [Key]
        public string ClientId { get; set; }

        [NotMapped]
        public Client Client { get; set; }

        public void AddDataToEntity()
        {
            ClientData = JsonConvert.SerializeObject(Client);
            ClientId = Client.ClientId;
        }

        public void MapDataFromEntity()
        {
            Client = JsonConvert.DeserializeObject<Client>(ClientData);
            ClientId = Client.ClientId;
        }
    }
}

Teh ConfigurationStoreContext implements the Entity Framework class to access the SQLite database. This could be easily changed to any other database supported by Entity Framework Core.

using IdentityServer4.Models;
using Microsoft.EntityFrameworkCore;

namespace AspNetCoreIdentityServer4Persistence.ConfigurationStore
{
    public class ConfigurationStoreContext : DbContext
    {
        public ConfigurationStoreContext(DbContextOptions<ConfigurationStoreContext> options) : base(options)
        { }

        public DbSet<ClientEntity> Clients { get; set; }
        public DbSet<ApiResourceEntity> ApiResources { get; set; }
        public DbSet<IdentityResourceEntity> IdentityResources { get; set; }
        

        protected override void OnModelCreating(ModelBuilder builder)
        {
            builder.Entity<ClientEntity>().HasKey(m => m.ClientId);
            builder.Entity<ApiResourceEntity>().HasKey(m => m.ApiResourceName);
            builder.Entity<IdentityResourceEntity>().HasKey(m => m.IdentityResourceName);
            base.OnModelCreating(builder);
        }
    }
}

Implementing the IResourceStore

The IResourceStore interface is used to save or access the ApiResource configurations and the IdentityResource data in the IdentityServer4 application. This is implemented in a similiar way to the IClientStore.

using IdentityServer4.Models;
using IdentityServer4.Stores;
using Microsoft.Extensions.Logging;
using System;
using System.Collections.Generic;
using System.Linq;
using System.Threading.Tasks;

namespace AspNetCoreIdentityServer4Persistence.ConfigurationStore
{
    public class ResourceStore : IResourceStore
    {
        private readonly ConfigurationStoreContext _context;
        private readonly ILogger _logger;

        public ResourceStore(ConfigurationStoreContext context, ILoggerFactory loggerFactory)
        {
            _context = context;
            _logger = loggerFactory.CreateLogger("ResourceStore");
        }

        public Task<ApiResource> FindApiResourceAsync(string name)
        {
            var apiResource = _context.ApiResources.First(t => t.ApiResourceName == name);
            apiResource.MapDataFromEntity();
            return Task.FromResult(apiResource.ApiResource);
        }

        public Task<IEnumerable<ApiResource>> FindApiResourcesByScopeAsync(IEnumerable<string> scopeNames)
        {
            if (scopeNames == null) throw new ArgumentNullException(nameof(scopeNames));


            var apiResources = new List<ApiResource>();
            var apiResourcesEntities = from i in _context.ApiResources
                                            where scopeNames.Contains(i.ApiResourceName)
                                            select i;

            foreach (var apiResourceEntity in apiResourcesEntities)
            {
                apiResourceEntity.MapDataFromEntity();

                apiResources.Add(apiResourceEntity.ApiResource);
            }

            return Task.FromResult(apiResources.AsEnumerable());
        }

        public Task<IEnumerable<IdentityResource>> FindIdentityResourcesByScopeAsync(IEnumerable<string> scopeNames)
        {
            if (scopeNames == null) throw new ArgumentNullException(nameof(scopeNames));

            var identityResources = new List<IdentityResource>();
            var identityResourcesEntities = from i in _context.IdentityResources
                             where scopeNames.Contains(i.IdentityResourceName)
                           select i;

            foreach (var identityResourceEntity in identityResourcesEntities)
            {
                identityResourceEntity.MapDataFromEntity();

                identityResources.Add(identityResourceEntity.IdentityResource);
            }

            return Task.FromResult(identityResources.AsEnumerable());
        }

        public Task<Resources> GetAllResourcesAsync()
        {
            var apiResourcesEntities = _context.ApiResources.ToList();
            var identityResourcesEntities = _context.IdentityResources.ToList();

            var apiResources = new List<ApiResource>();
            var identityResources= new List<IdentityResource>();

            foreach (var apiResourceEntity in apiResourcesEntities)
            {
                apiResourceEntity.MapDataFromEntity();

                apiResources.Add(apiResourceEntity.ApiResource);
            }

            foreach (var identityResourceEntity in identityResourcesEntities)
            {
                identityResourceEntity.MapDataFromEntity();

                identityResources.Add(identityResourceEntity.IdentityResource);
            }

            var result = new Resources(identityResources, apiResources);
            return Task.FromResult(result);
        }
    }
}

The IdentityResourceEntity class is used to persist the IdentityResource data.

using IdentityServer4.Models;
using Newtonsoft.Json;
using System;
using System.Collections.Generic;
using System.ComponentModel.DataAnnotations;
using System.ComponentModel.DataAnnotations.Schema;
using System.Linq;
using System.Threading.Tasks;

namespace AspNetCoreIdentityServer4Persistence.ConfigurationStore
{
    public class IdentityResourceEntity
    {
        public string IdentityResourceData { get; set; }

        [Key]
        public string IdentityResourceName { get; set; }

        [NotMapped]
        public IdentityResource IdentityResource { get; set; }

        public void AddDataToEntity()
        {
            IdentityResourceData = JsonConvert.SerializeObject(IdentityResource);
            IdentityResourceName = IdentityResource.Name;
        }

        public void MapDataFromEntity()
        {
            IdentityResource = JsonConvert.DeserializeObject<IdentityResource>(IdentityResourceData);
            IdentityResourceName = IdentityResource.Name;
        }
    }
}

The ApiResourceEntity is used to persist the ApiResource data.

using IdentityServer4.Models;
using Newtonsoft.Json;
using System;
using System.Collections.Generic;
using System.ComponentModel.DataAnnotations;
using System.ComponentModel.DataAnnotations.Schema;
using System.Linq;
using System.Threading.Tasks;

namespace AspNetCoreIdentityServer4Persistence.ConfigurationStore
{
    public class ApiResourceEntity
    {
        public string ApiResourceData { get; set; }

        [Key]
        public string ApiResourceName { get; set; }

        [NotMapped]
        public ApiResource ApiResource { get; set; }

        public void AddDataToEntity()
        {
            ApiResourceData = JsonConvert.SerializeObject(ApiResource);
            ApiResourceName = ApiResource.Name;
        }

        public void MapDataFromEntity()
        {
            ApiResource = JsonConvert.DeserializeObject<ApiResource>(ApiResourceData);
            ApiResourceName = ApiResource.Name;
        }
    }
}

Adding the stores to the IdentityServer4 MVC startup class

The created stores can now be used and added to the Startup class of the ASP.NET Core MVC host project for IdentityServer4. The AddDbContext method is used to setup the Entity Framework Core data access and the AddResourceStore as well as AddClientStore are used to add the configuration data to IdentityServer4. The two interfaces and also the implementations need to be registered with the IoC.

The default AddInMemory… extension methods are removed.

public void ConfigureServices(IServiceCollection services)
{
	services.AddDbContext<ConfigurationStoreContext>(options =>
		options.UseSqlite(
			Configuration.GetConnectionString("ConfigurationStoreConnection"),
			b => b.MigrationsAssembly("AspNetCoreIdentityServer4")
		)
	);

	...

	services.AddTransient<IClientStore, ClientStore>();
	services.AddTransient<IResourceStore, ResourceStore>();

	services.AddIdentityServer()
		.AddSigningCredential(cert)
		.AddResourceStore<ResourceStore>()
		.AddClientStore<ClientStore>()
		.AddAspNetIdentity<ApplicationUser>()
		.AddProfileService<IdentityWithAdditionalClaimsProfileService>();

}

Seeding the database

A simple .NET Core console application is used to seed the STS server with data. This class creates the different Client, ApiResources and IdentityResources as required. The data is added directly to the database using Entity Framework Core. If this was a micro service, you would implement an API on the STS server which adds, removes, updates the data as required.

static void Main(string[] args)
{
	try
	{
		var currentDirectory = Directory.GetCurrentDirectory();

		var configuration = new ConfigurationBuilder()
			.AddJsonFile($"{currentDirectory}\\..\\AspNetCoreIdentityServer4\\appsettings.json")
			.Build();

		var configurationStoreConnection = configuration.GetConnectionString("ConfigurationStoreConnection");

		var optionsBuilder = new DbContextOptionsBuilder<ConfigurationStoreContext>();
		optionsBuilder.UseSqlite(configurationStoreConnection);

		using (var configurationStoreContext = new ConfigurationStoreContext(optionsBuilder.Options))
		{
			configurationStoreContext.AddRange(Config.GetClients());
			configurationStoreContext.AddRange(Config.GetIdentityResources());
			configurationStoreContext.AddRange(Config.GetApiResources());
			configurationStoreContext.SaveChanges();
		}
	}
	catch (Exception e)
	{
		Console.WriteLine(e.Message);
	}

	Console.ReadLine();
}

The static Config class just adds the data like the IdentityServer4 examples.


Now the applications run using the configuration data stored in an Entity Framwork Core supported database.

Note:

This post shows how just the configuration data can be setup for IdentityServer4. To make it scale, you also need to implement the IPersistedGrantStore and CORS for each client in the database. A cache solution might also be required.

IdentityServer4 provides a full solution and example: IdentityServer4.EntityFramework

Links:

http://docs.identityserver.io/en/release/topics/deployment.html

https://damienbod.com/2016/01/07/experiments-with-entity-framework-7-and-asp-net-5-mvc-6/

https://docs.microsoft.com/en-us/ef/core/get-started/netcore/new-db-sqlite

https://docs.microsoft.com/en-us/ef/core/

http://docs.identityserver.io/en/release/reference/ef.html

https://github.com/IdentityServer/IdentityServer4.EntityFramework

https://elanderson.net/2017/07/identity-server-using-entity-framework-core-for-configuration-data/

http://docs.identityserver.io/en/release/quickstarts/8_entity_framework.html

Securing the CDN links in the ASP.NET Core 2.1 templates

$
0
0

This article uses the the ASP.NET Core 2.1 MVC template and shows how to secure the CDN links using the integrity parameter.

A new ASP.NET Core MVC application was created using the 2.1 template in Visual Studio.

This template uses HTTPS per default and has added some of the required HTTPS headers like HSTS which is required for any application. The template has added the integrity parameter to the javascript CDN links, but on the CSS CDN links, it is missing.

<script src="https://ajax.aspnetcdn.com/ajax/jquery/jquery-2.2.0.min.js"
 asp-fallback-src="~/lib/jquery/dist/jquery.min.js"
 asp-fallback-test="window.jQuery"  
 crossorigin="anonymous"
 integrity="sha384-K+ctZQ+LL8q6tP7I94W+qzQsfRV2a+AfHIi9k8z8l9ggpc8X+Ytst4yBo/hH+8Fk">
</script>

If the value of the integrity is changed, or the CDN script was changed, or for example a bitcoin miner was added to it, the MVC application will not load the script.

To test this, you can change the value of the integrity parameter on the script, and in the production environment, the script will not load and fallback to the localhost deployed script. By changing the value of the integrity parameter, it simulates a changed script on the CDN. The following snapshot shows an example of the possible errors sent to the browser:

Adding the integrity parameter to the CSS link

The template creates a bootstrap link in the _Layout.cshtml as follows:

<link rel="stylesheet" href="https://ajax.aspnetcdn.com/ajax/bootstrap/3.3.7/css/bootstrap.min.css"
              asp-fallback-href="~/lib/bootstrap/dist/css/bootstrap.min.css"
              asp-fallback-test-class="sr-only" asp-fallback-test-property="position" asp-fallback-test-value="absolute" />

This is missing the integrity parameter. To fix this, the integrity parameter can be added to the link.

<link rel="stylesheet" 
          integrity="sha384-BVYiiSIFeK1dGmJRAkycuHAHRg32OmUcww7on3RYdg4Va+PmSTsz/K68vbdEjh4u" 
          crossorigin="anonymous"
          href="https://ajax.aspnetcdn.com/ajax/bootstrap/3.3.7/css/bootstrap.min.css"
          asp-fallback-href="~/lib/bootstrap/dist/css/bootstrap.min.css"
          asp-fallback-test-class="sr-only"
          asp-fallback-test-property="position" 
          asp-fallback-test-value="absolute" />

The value of the integrity parameter was created using SRI Hash Generator. When creating this, you have to be sure, that the link is safe. By using this CDN, your application trusts the CDN links.

Now if the css file was changed on the CDN server, the application will not load it.

The CSP Header of the application can also be improved. The application should only load from the required CDNs and no where else. This can be forced by adding the following CSP configuration:

content-security-policy: 
script-src 'self' https://ajax.aspnetcdn.com;
style-src 'self' https://ajax.aspnetcdn.com;
img-src 'self';
font-src 'self' https://ajax.aspnetcdn.com;
form-action 'self';
frame-ancestors 'self';
block-all-mixed-content

Or you can use NWebSec and add it to the startup.cs

app.UseCsp(opts => opts
	.BlockAllMixedContent()
	.FontSources(s => s.Self()
		.CustomSources("https://ajax.aspnetcdn.com"))
	.FormActions(s => s.Self())
	.FrameAncestors(s => s.Self())
	.ImageSources(s => s.Self())
	.StyleSources(s => s.Self()
		.CustomSources("https://ajax.aspnetcdn.com"))
	.ScriptSources(s => s.Self()
		.UnsafeInline()
		.CustomSources("https://ajax.aspnetcdn.com"))
);

Links:

https://developer.mozilla.org/en-US/docs/Web/Security/Subresource_Integrity

https://www.srihash.org/

https://www.troyhunt.com/protecting-your-embedded-content-with-subresource-integrity-sri/

https://scotthelme.co.uk/tag/cdn/

https://rehansaeed.com/tag/subresource-integrity-sri/

https://rehansaeed.com/subresource-integrity-taghelper-using-asp-net-core/

ASP.NET Core Authorization for Windows, Local accounts

$
0
0

This article shows how authorization could be implemented for an ASP.NET Core MVC application. The authorization logic is extracted into a separate project, which is required by some certification software requirements. This could also be deployed as a separate service.

Code: https://github.com/damienbod/AspNetCoreWindowsAuth

Blogs in this series:

Application Authorization Service

The authorization service uses the claims returned for the identity of the MVC application. The claims are returned from the ASP.NET Core MVC client app which authenticates using the OpenID Connect Hybrid flow. The values are then used to create or define the authorization logic.

The authorization service supports a single API method, IsAdmin. This method checks if the username is a defined admin, and that the person/client used a Windows account to login.

using System;

namespace AppAuthorizationService
{
    public class AppAuthorizationService : IAppAuthorizationService
    {
        public bool IsAdmin(string username, string providerClaimValue)
        {
            return RulesAdmin.IsAdmin(username, providerClaimValue);
        }
    }
}

The rules define the authorization process. This is just a simple static configuration class, but any database, configuration files, authorization API could be used to check, define the rules.

In this example, the administrators are defined in the class, and the Windows value is checked for the claim parameter.

using System;
using System.Collections.Generic;
using System.Text;

namespace AppAuthorizationService
{
    public static class RulesAdmin
    {

        private static List<string> adminUsers = new List<string>();

        private static List<string> adminProviders = new List<string>();

        public static bool IsAdmin(string username, string providerClaimValue)
        {
            if(adminUsers.Count == 0)
            {
                AddAllowedUsers();
                AddAllowedProviders();
            }

            if (adminUsers.Contains(username) && adminProviders.Contains(providerClaimValue))
            {
                return true;
            }

            return false;
        }

        private static void AddAllowedUsers()
        {
            adminUsers.Add("SWISSANGULAR\\Damien");
        }

        private static void AddAllowedProviders()
        {
            adminProviders.Add("Windows");
        }
    }
}

ASP.NET Core Policies

The application authorization service also defines the ASP.NET Core policies which can be used by the client application. An IAuthorizationRequirement is implemented.

using Microsoft.AspNetCore.Authorization;
 
namespace AppAuthorizationService
{
    public class IsAdminRequirement : IAuthorizationRequirement{}
}

The IAuthorizationRequirement implementation is then used in the AuthorizationHandler implementation IsAdminHandler. This handler checks, validates the claims, using the IAppAuthorizationService service.

using Microsoft.AspNetCore.Authorization;
using System;
using System.Linq;
using System.Threading.Tasks;

namespace AppAuthorizationService
{
    public class IsAdminHandler : AuthorizationHandler<IsAdminRequirement>
    {
        private IAppAuthorizationService _appAuthorizationService;

        public IsAdminHandler(IAppAuthorizationService appAuthorizationService)
        {
            _appAuthorizationService = appAuthorizationService;
        }

        protected override Task HandleRequirementAsync(AuthorizationHandlerContext context, IsAdminRequirement requirement)
        {
            if (context == null)
                throw new ArgumentNullException(nameof(context));
            if (requirement == null)
                throw new ArgumentNullException(nameof(requirement));

            var claimIdentityprovider = context.User.Claims.FirstOrDefault(t => t.Type == "http://schemas.microsoft.com/identity/claims/identityprovider");

            if (claimIdentityprovider != null && _appAuthorizationService.IsAdmin(context.User.Identity.Name, claimIdentityprovider.Value))
            {
                context.Succeed(requirement);
            }

            return Task.CompletedTask;
        }
    }
}

As an example, a second policy is also defined, which checks that the http://schemas.microsoft.com/identity/claims/identityprovider claim has a Windows value.

using Microsoft.AspNetCore.Authorization;

namespace AppAuthorizationService
{
    public static class MyPolicies
    {
        private static AuthorizationPolicy requireWindowsProviderPolicy;

        public static AuthorizationPolicy GetRequireWindowsProviderPolicy()
        {
            if (requireWindowsProviderPolicy != null) return requireWindowsProviderPolicy;

            requireWindowsProviderPolicy = new AuthorizationPolicyBuilder()
                  .RequireClaim("http://schemas.microsoft.com/identity/claims/identityprovider", "Windows")
                  .Build();

            return requireWindowsProviderPolicy;
        }
    }
}

Using the Authorization Service and Policies

The Authorization can then be used, by adding the services to the Startup of the client application.

services.AddSingleton<IAppAuthorizationService, AppAuthorizationService.AppAuthorizationService>();
services.AddSingleton<IAuthorizationHandler, IsAdminHandler>();

services.AddAuthorization(options =>
{
	options.AddPolicy("RequireWindowsProviderPolicy", MyPolicies.GetRequireWindowsProviderPolicy());
	options.AddPolicy("IsAdminRequirementPolicy", policyIsAdminRequirement =>
	{
		policyIsAdminRequirement.Requirements.Add(new IsAdminRequirement());
	});
});

The policies can then be used in a controller and validate that the IsAdminRequirementPolicy is fulfilled.

using Microsoft.AspNetCore.Authorization;
using Microsoft.AspNetCore.Mvc;

namespace MvcHybridClient.Controllers
{
    [Authorize(Policy = "IsAdminRequirementPolicy")]
    public class AdminController : Controller
    {
        public IActionResult Index()
        {
            return View();
        }
    }
}

Or the IAppAuthorizationService can be used directly if you wish to mix authorization within a controller.

private IAppAuthorizationService _appAuthorizationService;

public HomeController(IAppAuthorizationService appAuthorizationService)
{
	_appAuthorizationService = appAuthorizationService;
}

public IActionResult Index()
{
	// Windows or local => claim http://schemas.microsoft.com/identity/claims/identityprovider
	var claimIdentityprovider = 
	  User.Claims.FirstOrDefault(t => 
	    t.Type == "http://schemas.microsoft.com/identity/claims/identityprovider");

	if (claimIdentityprovider != null && 
	  _appAuthorizationService.IsAdmin(
	     User.Identity.Name, 
		 claimIdentityprovider.Value)
	)
	{
		// yes, this is an admin
		Console.WriteLine("This is an admin, we can do some specific admin logic!");
	}

	return View();
}

If an admin user from Windows logged in, the admin view can be accessed.

Or the local guest user only sees the home view.


Notes:

This is a good way of separating the authorization logic from the business application in your software. Some certified software processes, require that the application authorization, authentication is audited before each release, for each new deployment if anything changed.
By separating the logic, you can deploy, update the business application without doing a security audit. The authorization process could also be deployed to a separate process if required.

Links:

https://docs.microsoft.com/en-us/aspnet/core/security/authorization/views?view=aspnetcore-2.1&tabs=aspnetcore2x

https://docs.microsoft.com/en-us/aspnet/core/security/authentication/?view=aspnetcore-2.1

https://mva.microsoft.com/en-US/training-courses/introduction-to-identityserver-for-aspnet-core-17945

https://stackoverflow.com/questions/34951713/aspnet5-windows-authentication-get-group-name-from-claims/34955119

https://github.com/IdentityServer/IdentityServer4.Templates

https://docs.microsoft.com/en-us/iis/configuration/system.webserver/security/authentication/windowsauthentication/

Uploading and sending image messages with ASP.NET Core SignalR

$
0
0

This article shows how images could be uploaded using a file upload with a HTML form in an ASP.MVC Core view, and then sent to application clients using SignalR. The images are uploaded as an ICollection of IFormFile objects, and sent to the SignalR clients using a base64 string. Angular is used to implement the SignalR clients.

Code https://github.com/damienbod/AspNetCoreAngularSignalR

Posts in this series

SignalR Server

The SignalR Hub is really simple. This implements a single method which takes an ImageMessage type object as a parameter.

using System.Threading.Tasks;
using AspNetCoreAngularSignalR.Model;
using Microsoft.AspNetCore.SignalR;

namespace AspNetCoreAngularSignalR.SignalRHubs
{
    public class ImagesMessageHub : Hub
    {
        public Task ImageMessage(ImageMessage file)
        {
            return Clients.All.SendAsync("ImageMessage", file);
        }
    }
}

The ImageMessage class has two properties, one for the image byte array, and a second for the image information, which is required so that the client application can display the image.

public class ImageMessage
{
	public byte[] ImageBinary { get; set; }
	public string ImageHeaders { get; set; }
}

In this example, SignalR is added to the ASP.NET Core application in the Startup class, but this could also be done directly in the kestrel server. The AddSignalR middleware is added and then each Hub explicitly with a defined URL in the Configure method.

public void ConfigureServices(IServiceCollection services)
{
	...
	
	services.AddTransient<ValidateMimeMultipartContentFilter>();

	services.AddSignalR()
	  .AddMessagePackProtocol();

	services.AddMvc().SetCompatibilityVersion(CompatibilityVersion.Version_2_1);
}

public void Configure(IApplicationBuilder app, IHostingEnvironment env, ILoggerFactory loggerFactory)
{
	...

	app.UseSignalR(routes =>
	{
		routes.MapHub<ImagesMessageHub>("/zub");
	});

	app.UseMvc(routes =>
	{
		routes.MapRoute(
			name: "default",
			template: "{controller=FileClient}/{action=Index}/{id?}");
	});
}

A File Upload ASP.NET Core MVC controller is implemented to support the file upload. The SignalR IHubContext interface is added per dependency injection for the type ImagesMessageHub. When files are uploaded, the IFormFile collection which contain the images are read to memory and sent as a byte array to the SignalR clients. Maybe this could be optimized.

using System;
using System.Collections.Generic;
using System.IO;
using System.Threading.Tasks;
using AspNetCoreAngularSignalR.Model;
using AspNetCoreAngularSignalR.SignalRHubs;
using Microsoft.AspNetCore.Mvc;
using Microsoft.AspNetCore.SignalR;
using Microsoft.Net.Http.Headers;

namespace AspNetCoreAngularSignalR.Controllers
{
    [Route("api/[controller]")]
    public class FileUploadController : Controller
    {
        private readonly IHubContext<ImagesMessageHub> _hubContext;

        public FileUploadController(IHubContext<ImagesMessageHub> hubContext)
        {
            _hubContext = hubContext;
        }

        [Route("files")]
        [HttpPost]
        [ServiceFilter(typeof(ValidateMimeMultipartContentFilter))]
        public async Task<IActionResult> UploadFiles(FileDescriptionShort fileDescriptionShort)
        {
            if (ModelState.IsValid)
            {
                foreach (var file in fileDescriptionShort.File)
                {
                    if (file.Length > 0)
                    {
                        using (var memoryStream = new MemoryStream())
                        {
                            await file.CopyToAsync(memoryStream);

                            var imageMessage = new ImageMessage
                            {
                                ImageHeaders = "data:" + file.ContentType + ";base64,",
                                ImageBinary = memoryStream.ToArray()
                            };

                            await _hubContext.Clients.All.SendAsync("ImageMessage", imageMessage);
                        }
                    }
                }
            }

            return Redirect("/FileClient/Index");
        }
    }
}


SignalR Angular Client

The Angular SignalR client uses the HubConnection to receive ImageMessage messages. Each message is pushed to the client array which is used to display the images. The @aspnet/signalr npm package is required to use the HubConnection.

import { Component, OnInit } from '@angular/core';
import { HubConnection } from '@aspnet/signalr';
import * as signalR from '@aspnet/signalr';

import { ImageMessage } from '../imagemessage';

@Component({
    selector: 'app-images-component',
    templateUrl: './images.component.html'
})

export class ImagesComponent implements OnInit {
    private _hubConnection: HubConnection | undefined;
    public async: any;
    message = '';
    messages: string[] = [];

    images: ImageMessage[] = [];

    constructor() {
    }

    ngOnInit() {
        this._hubConnection = new signalR.HubConnectionBuilder()
            .withUrl('https://localhost:44324/zub')
            .configureLogging(signalR.LogLevel.Trace)
            .build();

        this._hubConnection.stop();

        this._hubConnection.start().catch(err => {
            console.error(err.toString())
        });

        this._hubConnection.on('ImageMessage', (data: any) => {
            console.log(data);
            this.images.push(data);
        });
    }
}

The Angular template displays the images using the header and the binary data properties.

<div class="container-fluid">

    <h1>Images</h1>

   <a href="https://localhost:44324/FileClient/Index" target="_blank">Upload Images</a> 

    <div class="row" *ngIf="images.length > 0">
        <img *ngFor="let image of images;" 
        width="150" style="margin-right:5px" 
        [src]="image.imageHeaders + image.imageBinary">
    </div>
</div>

File Upload

The images are uploaded using an ASP.NET Core MVC View which uses a multiple file input HTML control. This sends the files to the MVC Controller as a multipart/form-data request.

<form enctype="multipart/form-data" method="post" action="https://localhost:44324/api/FileUpload/files" id="ajaxUploadForm" novalidate="novalidate">

    <fieldset>
        <legend style="padding-top: 10px; padding-bottom: 10px;">Upload Images</legend>

        <div class="col-xs-12" style="padding: 10px;">
            <div class="col-xs-4">
                <label>Upload</label>
            </div>
            <div class="col-xs-7">
                <input type="file" id="fileInput" name="file" multiple>
            </div>
        </div>

        <div class="col-xs-12" style="padding: 10px;">
            <div class="col-xs-4">
                <input type="submit" value="Upload" id="ajaxUploadButton" class="btn">
            </div>
            <div class="col-xs-7">

            </div>
        </div>

    </fieldset>

</form>

When the application is run, n instances of the clients can be opened. Then one can be used to upload images to all the other SignalR clients.

This soultion works good, but has many ways, areas which could be optimized for performance.

Links

https://github.com/aspnet/SignalR

https://github.com/aspnet/SignalR#readme

https://radu-matei.com/blog/signalr-core/

https://www.npmjs.com/package/@aspnet/signalr-client

https://msgpack.org/

https://stackoverflow.com/questions/40214772/file-upload-in-angular?utm_medium=organic&utm_source=google_rich_qa&utm_campaign=google_rich_qa

https://stackoverflow.com/questions/39272970/angular-2-encode-image-to-base64?utm_medium=organic&utm_source=google_rich_qa&utm_campaign=google_rich_qa

Dynamic CSS in an ASP.NET Core MVC View Component

$
0
0

This post shows how a view with dynamic css styles could be implemented using an MVC view component in ASP.NET Core. The values are changed using a HTML form with ASP.NET Core tag helpers, and passed into the view component which displays the view using css styling. The styles are set at runtime.

Code: https://github.com/damienbod/AspNetCoreMvcDynamicViews

Creating the View Component

The View Component is a nice way of implementing components in ASP.NET Core MVC. The view component is saved in the \Views\Shared\Components\DynamicDisplay folder which fulfils some of the standard paths which are pre-defined by ASP.NET Core. This can be changed, but I always try to use the defaults where possible.

The DynamicDisplay class implements the ViewComponent class, which has a single async method InvokeAsync that returns a Task with the IViewComponentResult type.

using AspNetCoreMvcDynamicViews.Views.Shared.Components.DynamicDisplay;
using Microsoft.AspNetCore.Mvc;
using System.Threading.Tasks;

namespace AspNetCoreMvcDynamicViews.Views.Home.ViewComponents
{
    [ViewComponent(Name = "DynamicDisplay")]
    public class DynamicDisplay : ViewComponent
    {
        public async Task<IViewComponentResult> InvokeAsync(DynamicDisplayModel dynamicDisplayModel)
        {
            return View(await Task.FromResult(dynamicDisplayModel));
        }
    }
}

The view component uses a simple view model with some helper methods to make it easier to use the data in a cshtml view.

namespace AspNetCoreMvcDynamicViews.Views.Shared.Components.DynamicDisplay
{
    public class DynamicDisplayModel
    {
        public int NoOfHoles { get; set; } = 2;

        public int BoxHeight { get; set; } = 100;

        public int NoOfBoxes { get; set; } = 2;

        public int BoxWidth { get; set; } = 200;

        public string GetAsStringWithPx(int value)
        {
            return $"{value}px";
        }

        public string GetDisplayHeight()
        {
            return $"{BoxHeight + 50 }px";
        }

        public string GetDisplayWidth()
        {
            return $"{BoxWidth * NoOfBoxes}px";
        }
    }
}

The cshtml view uses both css classes and styles to do a dynamic display of the data.

@using AspNetCoreMvcDynamicViews.Views.Shared.Components.DynamicDisplay
@model DynamicDisplayModel

<div style="height:@Model.GetDisplayHeight(); width:@Model.GetDisplayWidth()">
    @for (var i = 0; i < Model.NoOfBoxes; i++)
    {
    <div class="box" style="width:@Model.GetAsStringWithPx(Model.BoxWidth);height:@Model.GetAsStringWithPx(Model.BoxHeight);">
        @if (Model.NoOfHoles == 4)
        {
            @await Html.PartialAsync("./FourHolesPartial.cshtml")
        }
        else if (Model.NoOfHoles == 2)
        {
            @await Html.PartialAsync("./TwoHolesPartial.cshtml")
        }
        else if (Model.NoOfHoles == 1)
        {
            <div class="row justify-content-center align-items-center" style="height:100%">
                <span class="dot" style=""></span>
            </div>
        }
    </div>
    }
</div>

Partial views are used inside the view component to display some of the different styles. The partial view is added using the @await Html.PartialAsync call. The box with the four holes is implemented in a partial view.

<div class="row" style="height:50%">
    <div class="col-6">
        <span class="dot" style="float:left;"></span>
    </div>
    <div class="col-6">
        <span class="dot" style="float:right;"></span>
    </div>
</div>

<div class="row align-items-end" style="height:50%">
    <div class="col-6">
        <span class="dot" style="float:left;"></span>
    </div>
    <div class="col-6">
        <span class="dot" style="float:right;"></span>
    </div>
</div>

And CSS classes are used to display the data.

.dot {
	height: 25px;
	width: 25px;
	background-color: #bbb;
	border-radius: 50%;
	display: inline-block;
}

.box {
	float: left;
	height: 100px;
	border: 1px solid gray;
	padding: 5px;
	margin: 5px;
	margin-left: 0;
	margin-right: -1px;
}

Using the View Component

The view component is then used in a cshtml view. This view implements the form which sends the data to the server. The view component is added using the Component.InvokeAsync method which takes only a model as a parameter and then name of the view component.

@using AspNetCoreMvcDynamicViews.Views.Shared.Components.DynamicDisplay
@model MyDisplayModel
@{
    ViewData["Title"] = "Home Page";
}

<div style="padding:20px;"></div>

<form asp-controller="Home" asp-action="Index" method="post">
    <div class="col-md-12">

        @*<div class="form-group row">
            <label  class="col-sm-3 col-form-label font-weight-bold">Circles</label>
            <div class="col-sm-9">
                <select class="form-control" asp-for="mmm" asp-items="mmmItmes"></select>
            </div>
        </div>*@

        <div class="form-group row">
            <label class="col-sm-5 col-form-label font-weight-bold">No of Holes</label>
            <select class="col-sm-5 form-control" asp-for="DynamicDisplayData.NoOfHoles">
                <option value="0" selected>No Holes</option>
                <option value="1">1 Hole</option>
                <option value="2">2 Holes</option>
                <option value="4">4 Holes</option>
            </select>
        </div>

        <div class="form-group row">
            <label class="col-sm-5 col-form-label font-weight-bold">Height in mm</label>
            <input class="col-sm-5 form-control" asp-for="DynamicDisplayData.BoxHeight" type="number" min="65" max="400" />
        </div>

        <div class="form-group row">
            <label class="col-sm-5 col-form-label font-weight-bold">No. of Boxes</label>
            <input class="col-sm-5 form-control" asp-for="DynamicDisplayData.NoOfBoxes" type="number" min="1" max="7" />
        </div>

        <div class="form-group row">
            <label class="col-sm-5 col-form-label font-weight-bold">Box Width</label>
            <input class="col-sm-5 form-control" asp-for="DynamicDisplayData.BoxWidth" type="number" min="65" max="400" />
        </div>

        <div class="form-group row">
            <button class="btn btn-primary col-sm-10" type="submit">Update</button>
        </div>

    </div>

    @await Component.InvokeAsync("DynamicDisplay", Model.DynamicDisplayData)

</form>

The MVC Controller implements two methods, one for the GET, and one for the POST. The form uses the POST to send the data to the server, so this could be saved if required.

public class HomeController : Controller
{
	[HttpGet]
	public IActionResult Index()
	{
		var model = new MyDisplayModel
		{
			DynamicDisplayData = new DynamicDisplayModel()
		};
		return View(model);
	}

	[HttpPost]
	public IActionResult Index(MyDisplayModel myDisplayModel)
	{
		// save data to db...
		return View("Index", myDisplayModel);
	}

Running the demo

When the application is started, the form is displayed, and the default values are displayed.

And when the update button is clicked, the values are visualized inside the view component.

Links:

https://docs.microsoft.com/en-us/aspnet/core/mvc/views/view-components?view=aspnetcore-2.1

https://docs.microsoft.com/en-us/aspnet/core/mvc/views/partial?view=aspnetcore-2.1

https://docs.microsoft.com/en-us/aspnet/core/mvc/views/razor?view=aspnetcore-2.1

An ASP.NET Core Razor Pages Bootstrap 4 Application using Webpack, Typescript, and npm

$
0
0

This article shows how an ASP.NET Core Razor Pages application could be setup to use webpack, Typescript and npm to build, and bundle the client js, CSS for development and production. The application uses Bootstrap 4.

Code: https://github.com/damienbod/AspNetCorePagesWebpack

The example is setup so that the vendor ( 3rd Party packages ) javascript files are used as part of the application in development, but CDN links are used for the production deployment. The vendor CSS files, (bootstrap 4) are loaded in the same way, locally for development, and CDNs for production. SASS is used to build the application CSS and this is built into the application bundle.

Getting the client packages using npm

A package.json file is added to the root of the project. This file is used to install the required npm packages and to define the scripts used for the client builds. All the packages for the project and the client build packages are added to this file.

{
 "scripts": {
  "build": "webpack --env=development",
  "build-watch": "webpack --env=development --watch",
  "release": "webpack --env=production",
  "publish": "npm run release && dotnet publish -c Release"
 },
 "dependencies": {
  "bootstrap": "4.1.1",
  "jquery": "3.3.1",
  "jquery-validation": "1.17.0",
  "jquery-validation-unobtrusive": "3.2.10",
  "core-js": "2.5.7",
  "zone.js": "0.8.26",
  "es6-promise": "^4.2.4",
  "ie-shim": "0.1.0",
  "isomorphic-fetch": "^2.2.1",
  "rxjs": "6.2.1"
 },
 "devDependencies": {
  "@types/node": "^10.3.4",
  "awesome-typescript-loader": "^5.2.0",
  "clean-webpack-plugin": "~0.1.19",
  "codelyzer": "^4.3.0",
  "concurrently": "^3.6.0",
  "copy-webpack-plugin": "^4.5.1",
  "css-loader": "~0.28.11",
  "file-loader": "^1.1.11",
  "html-webpack-plugin": "~3.2.0",
  "jquery": "^3.3.1",
  "json-loader": "^0.5.7",
  "mini-css-extract-plugin": "~0.4.0",
  "node-sass": "^4.9.0",
  "raw-loader": "^0.5.1",
  "rimraf": "^2.6.2",
  "sass-loader": "^7.0.3",
  "source-map-loader": "^0.2.3",
  "style-loader": "^0.21.0",
  "ts-loader": "~4.4.1",
  "tslint": "^5.10.0",
  "tslint-loader": "^3.6.0",
  "typescript": "~2.9.2",
  "uglifyjs-webpack-plugin": "^1.2.6",
  "url-loader": "^1.0.1",
  "webpack": "~4.12.0",
  "webpack-bundle-analyzer": "^2.13.1",
  "webpack-cli": "~3.0.6"
 }
}

Install nodeJS if not already installed and update npm (npm install -g npm) after installing nodeJS. Then install the packages.

> 
> npm install

A webpack config file is added to the root of the project. The development build or the production build can be started using this file.

/// <binding ProjectOpened='Run - Development' />

module.exports = function(env) {
  return require(`./Client/webpack.${env}.js`)
}

The webpack development build creates 3 files, a polyfills file, the vendor bundle file using the vendor.development.ts file and the app bundle using the main.ts as an entry point. The built files are created in the wwwroot/dist. The assets are copied 1 to 1 to the wwwroot. The CSS for bootstrap 4 is loaded directly to the wwwroot, and not bundled with the application CSS. This is then added in the header of the _Layout.cshtml. The sass files are built into the application directly into the app bundle.

const path = require('path');
const rxPaths = require('rxjs/_esm5/path-mapping');

const webpack = require('webpack');

const HtmlWebpackPlugin = require('html-webpack-plugin');
const CopyWebpackPlugin = require('copy-webpack-plugin');
const CleanWebpackPlugin = require('clean-webpack-plugin');

const helpers = require('./webpack.helpers');

const ROOT = path.resolve(__dirname, '..');

console.log('@@@@@@@@@ USING DEVELOPMENT @@@@@@@@@@@@@@@');

module.exports = {
  mode: 'development',
  devtool: 'source-map',
  performance: {
    hints: false
  },
  entry: {
    polyfills: './Client/polyfills.ts',
      vendor: './Client/vendor.development.ts',
      app: './Client/main.ts'
  },

  output: {
    path: ROOT + '/wwwroot/',
    filename: 'dist/[name].bundle.js',
    chunkFilename: 'dist/[id].chunk.js',
    publicPath: '/'
  },

  resolve: {
    extensions: ['.ts', '.js', '.json'],
    alias: rxPaths()
  },

  devServer: {
    historyApiFallback: true,
    contentBase: path.join(ROOT, '/wwwroot/'),
    watchOptions: {
      aggregateTimeout: 300,
      poll: 1000
    }
  },

  module: {
    rules: [
      {
        test: /\.ts$/,
        use: [
          'awesome-typescript-loader',
          'source-map-loader'
        ]
      },
      {
        test: /\.(png|jpg|gif|woff|woff2|ttf|svg|eot)$/,
        use: 'file-loader?name=assets/[name]-[hash:6].[ext]'
      },
      {
        test: /favicon.ico$/,
        use: 'file-loader?name=/[name].[ext]'
      },
      {
        test: /\.css$/,
        use: ['style-loader', 'css-loader']
      },
      {
        test: /\.scss$/,
          include: path.join(ROOT, 'Client/styles'),
        use: ['style-loader', 'css-loader', 'sass-loader']
      },
      {
        test: /\.scss$/,
          exclude: path.join(ROOT, 'Client/styles'),
        use: ['raw-loader', 'sass-loader']
      },
      {
        test: /\.html$/,
        use: 'raw-loader'
      }
    ],
    exprContextCritical: false
  },
  plugins: [
    function() {
      this.plugin('watch-run', function(watching, callback) {
        console.log(
          '\x1b[33m%s\x1b[0m',
          `Begin compile at ${new Date().toTimeString()}`
        );
        callback();
      });
    },

    new webpack.optimize.ModuleConcatenationPlugin(),

    new webpack.ProvidePlugin({
      $: 'jquery',
      jQuery: 'jquery',
      'window.jQuery': 'jquery'
    }),

    // new webpack.optimize.CommonsChunkPlugin({ name: ['vendor', 'polyfills'] }),

    new CleanWebpackPlugin(['./wwwroot/dist', './wwwroot/assets'], {
      root: ROOT
    }),

    new HtmlWebpackPlugin({
        filename: '../Pages/Shared/_Layout.cshtml',
        inject: 'body',
        template: 'Client/_Layout.cshtml'
    }),

    new CopyWebpackPlugin([
        { from: './Client/assets/*.*', to: 'assets/', flatten: true }
    ]),

    new CopyWebpackPlugin([
        { from: './node_modules/bootstrap/dist/css/*.*', to: 'css/', flatten: true }
    ])
  ]
};

The ASP.NET Core _Layout.cshtml src file is added to the Client folder. When webpack builds, the required bundles are added to the file, and copied to the Shared/Pages required by the Razor Pages.

<!DOCTYPE html>
<html>
<head>
    <meta charset="utf-8" />
    <meta name="viewport" content="width=device-width, initial-scale=1, shrink-to-fit=no">

    <environment exclude="Development">
        <link rel="stylesheet" href="https://stackpath.bootstrapcdn.com/bootstrap/4.1.1/css/bootstrap.min.css" integrity="sha384-WskhaSGFgHYWDcbwN70/dfYBj47jz9qbsMId/iRN3ewGhXQFZCSftd1LZCfmhktB" crossorigin="anonymous">
    </environment>

    <environment include="Development">
        <link href="~/css/bootstrap.min.css" rel="stylesheet" />
    </environment>

    <title>@ViewData["Title"] - ASP.NET Core Pages Webpack</title>
</head>
<body>
    <div class="container">
        <nav class="bg-dark mb-4 navbar navbar-dark navbar-expand-md">
            <a asp-page="/Index" class="navbar-brand">
                <em>ASP.NET Core Pages Webpack</em>
            </a>
            <button aria-controls="navbarCollapse" aria-expanded="false" aria-label="Toggle navigation" class="navbar-toggler" data-target="#topNavbarCollapse" data-toggle="collapse" type="button">
                <span class="navbar-toggler-icon"></span>
            </button>
            <div class="collapse navbar-collapse" id="topNavbarCollapse">
                <ul class="mr-auto navbar-nav">
                    <li class="nav-item">
                        <a asp-page="/Index" class="nav-link">Home</a>
                    </li>
                    <li class="nav-item">
                        <a asp-page="/About" class="nav-link">About</a>
                    </li>
                    <li class="nav-item">
                        <a asp-page="/Contact" class="nav-link">Contact</a>
                    </li>
                </ul>
                <ul class="navbar-nav">
                    <li class="nav-item">
                        <a class="nav-link" href="https://twitter.com/damien_bod">
                            <img height="30" src="assets/damienbod.jpg" />
                        </a>
                    </li>
                </ul>
            </div>
        </nav>

    </div>
    
    <partial name="_CookieConsentPartial" />

    <div class="container body-content">
        @RenderBody()
        <hr />
        <footer>
            <p>&copy; 2018 - ASP.NET Core Pages Webpack Bootstrap 4</p>
        </footer>
    </div>

    <environment exclude="Development">
        <!-- Optional JavaScript -->
        <!-- jQuery first, then Popper.js, then Bootstrap JS -->
        <script src="https://code.jquery.com/jquery-3.3.1.slim.min.js" integrity="sha384-q8i/X+965DzO0rT7abK41JStQIAqVgRVzpbzo5smXKp4YfRvH+8abtTE1Pi6jizo" crossorigin="anonymous"></script>
        <script src="https://cdnjs.cloudflare.com/ajax/libs/popper.js/1.14.3/umd/popper.min.js" integrity="sha384-ZMP7rVo3mIykV+2+9J3UJ46jBk0WLaUAdn689aCwoqbBJiSnjAK/l8WvCWPIPm49" crossorigin="anonymous"></script>
        <script src="https://stackpath.bootstrapcdn.com/bootstrap/4.1.1/js/bootstrap.min.js" integrity="sha384-smHYKdLADwkXOn1EmN1qk/HfnUcbVRZyYmZ4qpPea6sjB/pTJ0euyQp0Mk8ck+5T" crossorigin="anonymous"></script>
    </environment>

    @RenderSection("Scripts", required: false)
</body>
</html>

Client Production build

The webpack production is is very similar except that most, if not all of the vendor client libraries are removed and loaded using CDNs. You can choose where the production scripts should be read from, depending on the project. The vendor.production.ts in this project is empty.

The main.ts is the entry point for the application scripts. All typescript code can be added here.

import './styles/app.scss';

// Write your ts code here
console.log("My site scripts if needed");

In Visual Studio, the npm Task Runner can be installed and used to do the client builds.

Or from the cmd

>
> npm run build
>

When the application is started, the client bundles are used in the Pages application.

Links:

https://docs.microsoft.com/en-us/aspnet/core/razor-pages/?view=aspnetcore-2.1&tabs=visual-studio

https://getbootstrap.com/

https://webpack.js.org/

https://www.typescriptlang.org/

https://nodejs.org/en/

https://www.npmjs.com/

Updating ASP.NET Core Identity to use Bootstrap 4

$
0
0

This article shows how to update the default Identity Pages template to use Bootstrap 4. You need to scaffold the views into the project, and change the layouts and the views to use the new Bootstrap 4 classes and javascript. The base project is built using Webpack and npm. Bootstrap 4 is loaded from npm, unless using a CDN for production.

Code: https://github.com/damienbod/AspNetCorePagesWebpack

Create a new web application and add the Individual User accounts.

Scaffold the Identity UI views to the project. This blog explains how:

How to Scaffold Identity UI in ASP.NET Core 2.1

Switch the build to Webpack and npm and import Bootstrap 4.

You could do it like this:

An ASP.NET Core Razor Pages Bootstrap 4 Application using Webpack, Typescript, and npm

Or just import the the Bootstrap 4 stuff directly and remove the Bootstrap 3 stuff from the layout.

Now the Identity views need to be updated to use the Bootstrap 4 classes and scripts.

Change the base Layout in the Areas/Identity/Pages/Account/Manage/_Layout.cshtml file. The default layout must be used here, and not the hidden _Layout from the Identity package.

@{ 
    Layout = "/Pages/Shared/_Layout.cshtml";
}

<h2>Manage your account</h2>

<div>
    <h4>Change your account settings</h4>
    <hr />
    <div class="row">
        <div class="col-md-3">
            <partial name="_ManageNav" />
        </div>
        <div class="col-md-9">
            @RenderBody()
        </div>
    </div>
</div>

@section Scripts {
    @RenderSection("Scripts", required: false)
}

Update all the views to use the new Bootstrap 4 classes. For example the nav component classes have changed.

Here is the changed _ManageNav.cshtml view:

@inject SignInManager<IdentityUser> SignInManager
@{
    var hasExternalLogins = (await SignInManager.GetExternalAuthenticationSchemesAsync()).Any();
}
<nav class="navbar navbar-light">
    <ul class="mr-auto navbar-nav">
        <li class="nav-item @ManageNavPages.IndexNavClass(ViewContext)"><a class="nav-link" asp-page="./Index">Profile</a></li>
        <li class="nav-item @ManageNavPages.ChangePasswordNavClass(ViewContext)"><a class="nav-link" id="change-password" asp-page="./ChangePassword">Password</a></li>
        @if (hasExternalLogins)
        {
            <li class="nav-item @ManageNavPages.ExternalLoginsNavClass(ViewContext)"><a class="nav-link" id="external-login" asp-page="./ExternalLogins">External logins</a></li>
        }
        <li class="nav-item @ManageNavPages.TwoFactorAuthenticationNavClass(ViewContext)"><a class="nav-link" asp-page="./TwoFactorAuthentication">Two-factor authentication</a></li>
        <li class="nav-item @ManageNavPages.PersonalDataNavClass(ViewContext)"><a class="nav-link" asp-page="./PersonalData">Personal data</a></li>
    </ul>
</nav>

Also remove the Bootstrap 3 stuff from the _ValidationScriptsPartial.cshtml in the Identity Area.

And now your set.

Login page:

Manage the Password:

Links:

https://docs.microsoft.com/en-us/aspnet/core/razor-pages/?view=aspnetcore-2.1&tabs=visual-studio

http://www.talkingdotnet.com/how-to-scaffold-identity-ui-in-asp-net-core-2-1/

https://docs.microsoft.com/en-us/aspnet/core/security/authentication/scaffold-identity?view=aspnetcore-2.1&tabs=visual-studio

https://github.com/aspnet/Identity

https://getbootstrap.com/

https://webpack.js.org/

https://www.typescriptlang.org/

https://nodejs.org/en/

https://www.npmjs.com/


Updating part of an ASP.NET Core MVC View which uses Forms

$
0
0

This article shows how to update part of an ASP.NET Core MVC view which uses forms. Sometimes, within a form, some values depend on other ones, and cannot be updated on the client side. Changes in the form input values sends a partial view update which updates the rest of the dependent values, but not the whole MVC View. This can be implemented using ajax requests. The values can then be used to do a create, or an update request.

Code: https://github.com/damienbod/MvcDynamicDropdownList

The Index View used in the MVC routing implements the complete view with a partial view which will be asynchronously updated on certain input value changes. The Javascript code uses jQuery. Because the partial view DOM elements are reloaded after each change, the on function is used to define the change events, so that it will work after a partial update.

When the ajax request returns, it adds the result to the DOM element with the id = ‘partial’. The change events are added to all child elements, with the id = ‘updateevent’. This could be changed, depending on how you want to find the DOM input elements.

The partial view is updated inside a form. The form is used to do a create request, which updates the whole view. The Javascript requests only updates the partial view, with the new model values depending on the business requirements, which are implemented in the server side code.

@using  AspNetCoreMvcDynamicViews.Models
@model ConfigureSectionsModel
@{
    ViewData["Title"] = "Configure View";
}

<div style="padding:20px;"></div>

@section Scripts{
    <script language="javascript">

        $(function () {
            $('#partial').on('change', '.updateevent', function (el) {
                $.ajax({
                    url: window.location.origin + "/Configure/UpdateViewData",
                    type: "post",
                    data: $("#partialform").serialize(), 
                    success: function (result) {
                        $("#partial").html(result);
                    }
                });
            });
        });

    </script>
}

<form id="partialform" asp-controller="Configure" asp-action="Create" method="post">
    <div class="col-md-12">
        <div id="partial">
            <partial name="PartialConfigure" model="Model.ConfigueSectionAGetModel" />
        </div>

        <div class="form-group row">
            <button class="btn btn-primary col-sm-12" type="submit">Create</button>
        </div>
    </div>
</form>

The partial view is a simple ASP.NET Core view. The model values are used here, and the id values are added to the DOM elements for the jQuery Javascript code. This is then reloaded with the correct values on each change of a DOM element with the id = ‘updateevent’.

@using AspNetCoreMvcDynamicViews.Views.Shared.Components.ConfigueSectionA
@model ConfigueSectionAGetModel

<div class="form-group row">
    <label class="col-sm-5 col-form-label font-weight-bold">LengthA</label>
    <input class="col-sm-5 form-control updateevent" asp-for="LengthA" type="number" min="5" max="400" />
</div>

<div class="form-group row">
    <label class="col-sm-5 col-form-label font-weight-bold">@Model.LengthB</label>
    <input class="col-sm-5 form-control updateevent" asp-for="LengthB" type="number" min="5" max="400" />
</div>

<div class="form-group row">
    <label class="col-sm-5 col-form-label font-weight-bold">LengthAB</label>
    <label class="col-sm-5 form-control ">@Model.LengthAB</label>
    <input readonly asp-for="LengthAB" value="@Model.LengthAB"  type="hidden" />
</div>

<div class="form-group row">
    <label class="col-sm-5 col-form-label font-weight-bold">PartType</label>
    <select class="col-sm-5 form-control updateevent" asp-items="Model.PartTypeItems" asp-for="PartType" type="text"></select>
</div>

The MVC controller implements the server code for view requests. The UpdateViewData action method calls the business logic for updating the input values.

/// <summary>
/// async partial update, set your properties here
/// </summary>
/// <param name="configueSectionAGetModel"></param>
/// <returns></returns>
[HttpPost]
[ValidateAntiForgeryToken]
public IActionResult UpdateViewData(ConfigueSectionAGetModel configueSectionAGetModel)
{
	_configureService.UpdateLengthA_LengthB(configueSectionAGetModel);
	_configureService.UpdateSelectType(configueSectionAGetModel);
	return PartialView("PartialConfigure", configueSectionAGetModel);
}

The ConfigureController class implements the action methods to support get, update and create requests.

public class ConfigureController : Controller
{
	private readonly ConfigureService _configureService;

	public ConfigureController(ConfigureService configureService)
	{
		_configureService = configureService;
	}

	/// <summary>
	/// Get a new object, used for the create
	/// </summary>
	/// <returns></returns>
	[HttpGet]
	public IActionResult Index()
	{
		return View(_configureService.GetDefaultModel());
	}

	/// <summary>
	/// create a new object
	/// </summary>
	/// <param name="configueSectionAGetModel"></param>
	/// <returns></returns>
	[HttpPost]
	[ValidateAntiForgeryToken]
	public IActionResult Create(ConfigueSectionAGetModel configueSectionAGetModel)
	{
		var model = new ConfigureSectionsModel
		{
			ConfigueSectionAGetModel = configueSectionAGetModel
		};

		if (ModelState.IsValid)
		{
			var id = _configureService.AddConfigueSectionAModel(configueSectionAGetModel);
			return Redirect($"Update/{id}");
		}

		return View("Index", model);
	}

Build and run the application and the example can be called using:

https://localhost:44306/Configure

Links:

https://docs.microsoft.com/en-us/aspnet/core/mvc/overview?view=aspnetcore-2.1

https://dotnetthoughts.net/jquery-unobtrusive-ajax-helpers-in-aspnet-core/

http://www.talkingdotnet.com/handle-ajax-requests-in-asp-net-core-razor-pages/

Is Active Route Tag Helper for ASP.NET MVC Core with Razor Page support

$
0
0

Ben Cull did an excellent tag helper which makes it easy to set the active class element using the route data from an ASP.NET Core MVC application. This blog uses this and extends the implementation with support for Razor Pages.

Original blog: Is Active Route Tag Helper for ASP.NET MVC Core by Ben Cull

The IHttpContextAccessor contextAccessor is added to the existing code from Ben. This is required so that the actual active Page can be read from the URL. The Page property is also added so that the selected page can be read from the HTML element.

The ShouldBeActive method then checks if an ASP.NET Core MVC route is used, or a Razor Page. Depending on this, the URL Path is checked and compared with the Razor Page, or like in the original helper, the MVC routing is used to set, reset the active class.

using Microsoft.AspNetCore.Http;
using Microsoft.AspNetCore.Mvc.Rendering;
using Microsoft.AspNetCore.Mvc.ViewFeatures;
using Microsoft.AspNetCore.Razor.TagHelpers;
using System;
using System.Collections.Generic;
using System.Linq;

namespace DamienbodTaghelpers
{
    [HtmlTargetElement(Attributes = "is-active-route")]
    public class ActiveRouteTagHelper : TagHelper
    {
        private readonly IHttpContextAccessor _contextAccessor;

        public ActiveRouteTagHelper(IHttpContextAccessor contextAccessor)
        {
            _contextAccessor = contextAccessor;
        }

        private IDictionary<string, string> _routeValues;

        /// <summary>The name of the action method.</summary>
        /// <remarks>Must be <c>null</c> if <see cref="P:Microsoft.AspNetCore.Mvc.TagHelpers.AnchorTagHelper.Route" /> is non-<c>null</c>.</remarks>
        [HtmlAttributeName("asp-action")]
        public string Action { get; set; }

        /// <summary>The name of the controller.</summary>
        /// <remarks>Must be <c>null</c> if <see cref="P:Microsoft.AspNetCore.Mvc.TagHelpers.AnchorTagHelper.Route" /> is non-<c>null</c>.</remarks>
        [HtmlAttributeName("asp-controller")]
        public string Controller { get; set; }

        [HtmlAttributeName("asp-page")]
        public string Page { get; set; }
        
        /// <summary>Additional parameters for the route.</summary>
        [HtmlAttributeName("asp-all-route-data", DictionaryAttributePrefix = "asp-route-")]
        public IDictionary<string, string> RouteValues
        {
            get
            {
                if (this._routeValues == null)
                    this._routeValues = (IDictionary<string, string>)new Dictionary<string, string>((IEqualityComparer<string>)StringComparer.OrdinalIgnoreCase);
                return this._routeValues;
            }
            set
            {
                this._routeValues = value;
            }
        }

        /// <summary>
        /// Gets or sets the <see cref="T:Microsoft.AspNetCore.Mvc.Rendering.ViewContext" /> for the current request.
        /// </summary>
        [HtmlAttributeNotBound]
        [ViewContext]
        public ViewContext ViewContext { get; set; }

        public override void Process(TagHelperContext context, TagHelperOutput output)
        {
            base.Process(context, output);

            if (ShouldBeActive())
            {
                MakeActive(output);
            }

            output.Attributes.RemoveAll("is-active-route");
        }

        private bool ShouldBeActive()
        {
            string currentController = string.Empty;
            string currentAction = string.Empty;

            if (ViewContext.RouteData.Values["Controller"] != null)
            {
                currentController = ViewContext.RouteData.Values["Controller"].ToString();
            }

            if (ViewContext.RouteData.Values["Action"] != null)
            {
                currentAction = ViewContext.RouteData.Values["Action"].ToString();
            }

            if(Controller != null)
            {
                if (!string.IsNullOrWhiteSpace(Controller) && Controller.ToLower() != currentController.ToLower())
                {
                    return false;
                }

                if (!string.IsNullOrWhiteSpace(Action) && Action.ToLower() != currentAction.ToLower())
                {
                    return false;
                }
            }

            if (Page != null)
            {
                if (!string.IsNullOrWhiteSpace(Page) && Page.ToLower() != _contextAccessor.HttpContext.Request.Path.Value.ToLower())
                {
                    return false;
                }
            }

            foreach (KeyValuePair<string, string> routeValue in RouteValues)
            {
                if (!ViewContext.RouteData.Values.ContainsKey(routeValue.Key) ||
                    ViewContext.RouteData.Values[routeValue.Key].ToString() != routeValue.Value)
                {
                    return false;
                }
            }

            return true;
        }

        private void MakeActive(TagHelperOutput output)
        {
            var classAttr = output.Attributes.FirstOrDefault(a => a.Name == "class");
            if (classAttr == null)
            {
                classAttr = new TagHelperAttribute("class", "active");
                output.Attributes.Add(classAttr);
            }
            else if (classAttr.Value == null || classAttr.Value.ToString().IndexOf("active") < 0)
            {
                output.Attributes.SetAttribute("class", classAttr.Value == null
                    ? "active"
                    : classAttr.Value.ToString() + " active");
            }
        }
    }
}

The IHttpContextAccessor needs the be added to the IoC in the Startup class.

public void ConfigureServices(IServiceCollection services)
{
  services.TryAddSingleton<IHttpContextAccessor, HttpContextAccessor>();

In the _viewImports, add the tag helper namespace which matches the namespace used in the class.

@addTagHelper *, taghelpNamespaceUsedInYourProject

Add the tag helper can be used in the razor views which will work for both MVC views and also Razor Page views.

    <ul class="nav nav-pills flex-column">
            <li class="nav-item">
                <a is-active-route class="nav-link" asp-action="Index" asp-controller="A_MVC_Controller">This is a MVC route</a>
            </li>
    
            <li class="nav-item">
                <a is-active-route class="nav-link" asp-page="/MyRazorPage">Some Razor Page</a>
            </li>
    </ul>

Links:

https://benjii.me/2017/01/is-active-route-tag-helper-asp-net-mvc-core/

https://docs.microsoft.com/en-us/aspnet/core/mvc/views/tag-helpers/intro?view=aspnetcore-2.1

Creating PDF files in ASP.NET Core

$
0
0

This article shows how to create PDF files in ASP.NET Core. I decided I wanted to use PDFSharp, because I like this library, but no NuGet packages exist for .NET Standard 2.0. YetaWF created a port for this, which was used 1:1 in this example, without changes. It would be great to see PDFSharp as a .NET Standard 2.0 NuGet package.

Code: https://github.com/damienbod/AspNetCorePdf

Part 2: Creating a PDF in ASP.NET Core using MigraDoc PDFSharp

Setting up the projects

To get the PDFSharp code working in ASP.NET Core, the best way is to clone the PDFsharp-.netcoreapp2.0 repository from YetaWF, and add this to your solution as a project. Then create an ASP.NET Core application, MVC or Razor Pages as preferred, and add a reference to the project.

Using the PDFSharp project

The example adds a HTTP Get request, creates a PdfData model which is used as an input for the PDF document. The PdfService was added as a scoped service to the IoC, and it creates the PDF document. This PDF document is then saved to the file system. The document is also returned in the HTTP response.

[HttpGet]
public FileStreamResult CreatePdf()
{
	var data = new PdfData
	{
		DocumentTitle = "This is my demo document Title",
		DocumentName = "myFirst",
		CreatedBy = "Damien",
		Description = "some data description which I have, and want to display in the PDF file..., This is another text, what is happening here, why is this text display...",
		DisplayListItems = new List<ItemsToDisplay>
		{
			new ItemsToDisplay{ Id = "Print Servers", Data1= "some data", Data2 = "more data to display"},
			new ItemsToDisplay{ Id = "Network Stuff", Data1= "IP4", Data2 = "any left"},
			new ItemsToDisplay{ Id = "Job details", Data1= "too many", Data2 = "say no"},
			new ItemsToDisplay{ Id = "Firewall", Data1= "what", Data2 = "Let's burn it"}

		}
	};
	var path = _pdfService.CreatePdf(data);

	var stream = new FileStream(path, FileMode.Open);
	return File(stream, "application/pdf");
}

The PdfService implements one public method, CreatePdf which takes the model as a parameter. The path configurations are defined as private fields in the class. In a real application, these settings would be read from the app.settings. The method sets up the PDF document and pages using the PDFSharp project. Each part of the document is then created in different private methods.

using AspNetCorePdf.PdfProvider.DataModel;
using PdfSharp.Drawing;
using PdfSharp.Drawing.Layout;
using PdfSharp.Fonts;
using PdfSharp.Pdf;
using System;
using System.IO;

namespace AspNetCorePdf.PdfProvider
{
    public class PdfService : IPdfService
    {
        private string _createdDocsPath = ".\\PdfProvider\\Created";
        private string _imagesPath = ".\\PdfProvider\\Images";
        private string _resourcesPath = ".\\PdfProvider\\Resources";

        public string CreatePdf(PdfData pdfData)
        {
            if (GlobalFontSettings.FontResolver == null)
            {
                GlobalFontSettings.FontResolver = new FontResolver(_resourcesPath);
            }

            var document = new PdfDocument();
            var page = document.AddPage();
            var gfx = XGraphics.FromPdfPage(page);
    
            AddTitleLogo(gfx, page, $"{_imagesPath}\\logo.jpg", 0, 0);
            AddTitleAndFooter(page, gfx, pdfData.DocumentTitle, document, pdfData);

            AddDescription(gfx, pdfData);

            AddList(gfx, pdfData);

            string docName = $"{_createdDocsPath}/{pdfData.DocumentName}-{DateTime.UtcNow.ToOADate()}.pdf";
            document.Save(docName);
            return docName;
        }

XGraphics is then used to create the document as required. Refer to the samples for reference:

http://www.pdfsharp.net/wiki/PDFsharpSamples.ashx

void AddTitleLogo(XGraphics gfx, PdfPage page, string imagePath, int xPosition, int yPosition)
{
	if (!File.Exists(imagePath))
	{
		throw new FileNotFoundException(String.Format("Could not find image {0}.", imagePath));
	}

	XImage xImage = XImage.FromFile(imagePath);
	gfx.DrawImage(xImage, xPosition, yPosition, xImage.PixelWidth / 8, xImage.PixelWidth / 8);
}

void AddTitleAndFooter(PdfPage page, XGraphics gfx, string title, PdfDocument document, PdfData pdfData)
{
	XRect rect = new XRect(new XPoint(), gfx.PageSize);
	rect.Inflate(-10, -15);
	XFont font = new XFont("OpenSans", 14, XFontStyle.Bold);
	gfx.DrawString(title, font, XBrushes.MidnightBlue, rect, XStringFormats.TopCenter);

	rect.Offset(0, 5);
	font = new XFont("OpenSans", 8, XFontStyle.Italic);
	XStringFormat format = new XStringFormat();
	format.Alignment = XStringAlignment.Near;
	format.LineAlignment = XLineAlignment.Far;
	gfx.DrawString("Created by " + pdfData.CreatedBy, font, XBrushes.DarkOrchid, rect, format);

	font = new XFont("OpenSans", 8);
	format.Alignment = XStringAlignment.Center;
	gfx.DrawString(document.PageCount.ToString(), font, XBrushes.DarkOrchid, rect, format);

	document.Outlines.Add(title, page, true);
}

void AddDescription(XGraphics gfx, PdfData pdfData)
{
	var font = new XFont("OpenSans", 14, XFontStyle.Regular);
	XTextFormatter tf = new XTextFormatter(gfx);
	XRect rect = new XRect(40, 100, 520, 100);
	gfx.DrawRectangle(XBrushes.White, rect);
	tf.DrawString(pdfData.Description, font, XBrushes.Black, rect, XStringFormats.TopLeft);
}

void AddList(XGraphics gfx, PdfData pdfData)
{
	int startingHeight = 200;
	int listItemHeight = 30;

	for (int i = 0; i < pdfData.DisplayListItems.Count; i++)
	{
		var font = new XFont("OpenSans", 14, XFontStyle.Regular);
		XTextFormatter tf = new XTextFormatter(gfx);
		XRect rect = new XRect(60, startingHeight, 500, listItemHeight);
		gfx.DrawRectangle(XBrushes.White, rect);
		var data = $"{i}. {pdfData.DisplayListItems[i].Id} | {pdfData.DisplayListItems[i].Data1} | {pdfData.DisplayListItems[i].Data2}";
		tf.DrawString(data, font, XBrushes.Black, rect, XStringFormats.TopLeft);

		startingHeight = startingHeight + listItemHeight;
	}
}

When the application is run, the create PDF link can be clicked, and it creates the PDF.

The PDF is returned in the browser. Each PDF can also be viewed in the Created directory.

This works really good, with little effort to setup. The used PDFSharp code is included in the repository. The MigraDoc is not part of this, it would be nice to use this as well, but no solution exists, which works for ASP.NET Core.

I really hope the the PDFSharp NuGet package as well as MigraDoc gets ported to .NET Core.

Links:

https://damienbod.com/2018/10/03/creating-a-pdf-in-asp-net-core-using-migradoc-pdfsharp/

https://github.com/YetaWF/PDFsharp-.netcoreapp2.0

http://www.pdfsharp.net/wiki/Graphics-sample.ashx

http://www.pdfsharp.net/wiki/PDFsharpSamples.ashx

http://www.pdfsharp.net/

https://odetocode.com/blogs/scott/archive/2018/02/14/pdf-generation-in-azure-functions-v2.aspx

http://fizzylogic.nl/2017/08/03/how-to-generate-pdf-documents-in-asp-net-core/

https://github.com/rdvojmoc/DinkToPdf

https://photosauce.net/blog/post/5-reasons-you-should-stop-using-systemdrawing-from-aspnet

Implementing User Management with ASP.NET Core Identity and custom claims

$
0
0

The article shows how to implement user management for an ASP.NET Core application using ASP.NET Core Identity. The application uses custom claims, which need to be added to the user identity after a successful login, and then an ASP.NET Core policy is used to authorize the identity.

Code: https://github.com/damienbod/AspNetCoreAngularSignalRSecurity

Setting up the Project

The demo application is implemented using ASP.NET Core MVC and uses the IdentityServer and IdentityServer4.AspNetIdentity NuGet packages.

ASP.NET Core Identity is then added in the Startup class ConfigureServices method. SQLite is used as a database. A scoped service for the IUserClaimsPrincipalFactory is added so that the additional claims can be added to the Context.User.Identity scoped object.

An IAuthorizationHandler service is added, so that the IsAdminHandler can be used for the IsAdmin policy. This policy can then be used to check if the identity has the custom claims which was added to the identity in the AdditionalUserClaimsPrincipalFactory implementation.

public void ConfigureServices(IServiceCollection services)
{
	...
	
	services.AddDbContext<ApplicationDbContext>(options =>
	 options.UseSqlite(Configuration.GetConnectionString("DefaultConnection")));

	services.AddIdentity<ApplicationUser, IdentityRole>()
	 .AddEntityFrameworkStores<ApplicationDbContext>()
	 .AddDefaultTokenProviders();

	services.AddScoped<IUserClaimsPrincipalFactory<ApplicationUser>, 
	 AdditionalUserClaimsPrincipalFactory>();

	services.AddSingleton<IAuthorizationHandler, IsAdminHandler>();
	services.AddAuthorization(options =>
	{
		options.AddPolicy("IsAdmin", policyIsAdminRequirement =>
		{
			policyIsAdminRequirement.Requirements.Add(new IsAdminRequirement());
		});
	});

	...
}

The application uses IdentityServer4. The UseIdentityServer extension is used instead of the UseAuthentication method to use the authentication.

public void Configure(IApplicationBuilder app, 
  IHostingEnvironment env, 
  ILoggerFactory loggerFactory)
{
	...
	
	app.UseStaticFiles();

	app.UseIdentityServer();

	app.UseMvc(routes =>
	{
		routes.MapRoute(
			name: "default",
			template: "{controller=Home}/{action=Index}/{id?}");
	});
}

The ApplicationUser class implements the IdentityUser class. Additional database fields can be added here, which will then be used to create the claims for the logged in user.

using Microsoft.AspNetCore.Identity;

namespace StsServer.Models
{
    public class ApplicationUser : IdentityUser
    {
        public bool IsAdmin { get; set; }
        public string DataEventRecordsRole { get; set; }
        public string SecuredFilesRole { get; set; }
    }
}

The AdditionalUserClaimsPrincipalFactory class implements the UserClaimsPrincipalFactory class, and can be used to add the additional claims to the user object in the HTTP context. This was added as a scoped service in the Startup class. The ApplicationUser is then used, so that the custom claims can be added to the identity.

using IdentityModel;
using Microsoft.AspNetCore.Identity;
using Microsoft.Extensions.Options;
using StsServer.Models;
using System.Collections.Generic;
using System.Security.Claims;
using System.Threading.Tasks;

namespace StsServer
{
    public class AdditionalUserClaimsPrincipalFactory 
          : UserClaimsPrincipalFactory<ApplicationUser, IdentityRole>
    {
        public AdditionalUserClaimsPrincipalFactory( 
            UserManager<ApplicationUser> userManager,
            RoleManager<IdentityRole> roleManager, 
            IOptions<IdentityOptions> optionsAccessor) 
            : base(userManager, roleManager, optionsAccessor)
        {
        }

        public async override Task<ClaimsPrincipal> CreateAsync(ApplicationUser user)
        {
            var principal = await base.CreateAsync(user);
            var identity = (ClaimsIdentity)principal.Identity;

            var claims = new List<Claim>
            {
                new Claim(JwtClaimTypes.Role, "dataEventRecords"),
                new Claim(JwtClaimTypes.Role, "dataEventRecords.user")
            };

            if (user.DataEventRecordsRole == "dataEventRecords.admin")
            {
                claims.Add(new Claim(JwtClaimTypes.Role, "dataEventRecords.admin"));
            }

            if (user.IsAdmin)
            {
                claims.Add(new Claim(JwtClaimTypes.Role, "admin"));
            }
            else
            {
                claims.Add(new Claim(JwtClaimTypes.Role, "user"));
            }

            identity.AddClaims(claims);
            return principal;
        }
    }
}

Now the policy IsAdmin can check for this. First a requirement is defined. This is done by implementing the IAuthorizationRequirement interface.

using Microsoft.AspNetCore.Authorization;
 
namespace StsServer
{
    public class IsAdminRequirement : IAuthorizationRequirement{}
}

The IsAdminHandler AuthorizationHandler uses the IsAdminRequirement requirement. If the user has the role claim with value admin, then the handler will succeed.

using Microsoft.AspNetCore.Authorization;
using System;
using System.Linq;
using System.Threading.Tasks;

namespace StsServer
{
    public class IsAdminHandler : AuthorizationHandler<IsAdminRequirement>
    {
        protected override Task HandleRequirementAsync(
          AuthorizationHandlerContext context, IsAdminRequirement requirement)
        {
            if (context == null)
                throw new ArgumentNullException(nameof(context));
            if (requirement == null)
                throw new ArgumentNullException(nameof(requirement));

            var adminClaim = context.User.Claims.FirstOrDefault(t => t.Value == "admin" && t.Type == "role"); 
            if (adminClaim != null)
            {
                context.Succeed(requirement);
            }

            return Task.CompletedTask;
        }
    }
}

The AdminController adds a way to do the CRUD operations for the Identity users. The AdminController uses the Authorize attribute with the policy IsAdmin to authorize. The AuthenticationSchemes needs to be set to “Identity.Application”, because Identity is being used. Now admins can create, or edit Identity users.

using System.Linq;
using System.Threading.Tasks;
using Microsoft.AspNetCore.Authorization;
using Microsoft.AspNetCore.Identity;
using Microsoft.AspNetCore.Mvc;
using Microsoft.EntityFrameworkCore;
using StsServer.Data;
using StsServer.Models;

namespace StsServer.Controllers
{
    [Authorize(AuthenticationSchemes = "Identity.Application", Policy = "IsAdmin")]
    public class AdminController : Controller
    {
        private readonly ApplicationDbContext _context;
        private readonly UserManager<ApplicationUser> _userManager;

        public AdminController(ApplicationDbContext context, UserManager<ApplicationUser> userManager)
        {
            _context = context;
            _userManager = userManager;
        }

        public async Task<IActionResult> Index()
        {
            return View(await _context.Users.Select(user => 
                new AdminViewModel {
                    Email = user.Email,
                    IsAdmin = user.IsAdmin,
                    DataEventRecordsRole = user.DataEventRecordsRole,
                    SecuredFilesRole = user.SecuredFilesRole
                }).ToListAsync());
        }

        public async Task<IActionResult> Details(string id)
        {
            if (id == null)
            {
                return NotFound();
            }

            var user = await _context.Users
                .FirstOrDefaultAsync(m => m.Email == id);
            if (user == null)
            {
                return NotFound();
            }

            return View(new AdminViewModel
            {
                Email = user.Email,
                IsAdmin = user.IsAdmin,
                DataEventRecordsRole = user.DataEventRecordsRole,
                SecuredFilesRole = user.SecuredFilesRole
            });
        }

        public IActionResult Create()
        {
            return View();
        }

        [HttpPost]
        [ValidateAntiForgeryToken]
        public async Task<IActionResult> Create(
         [Bind("Email,IsAdmin,DataEventRecordsRole,SecuredFilesRole")] AdminViewModel adminViewModel)
        {
            if (ModelState.IsValid)
            {
                await _userManager.CreateAsync(new ApplicationUser
                {
                    Email = adminViewModel.Email,
                    IsAdmin = adminViewModel.IsAdmin,
                    DataEventRecordsRole = adminViewModel.DataEventRecordsRole,
                    SecuredFilesRole = adminViewModel.SecuredFilesRole,
                    UserName = adminViewModel.Email
                });
                return RedirectToAction(nameof(Index));
            }
            return View(adminViewModel);
        }

        public async Task<IActionResult> Edit(string id)
        {
            if (id == null)
            {
                return NotFound();
            }

            var user = await _userManager.FindByEmailAsync(id);
            if (user == null)
            {
                return NotFound();
            }

            return View(new AdminViewModel
            {
                Email = user.Email,
                IsAdmin = user.IsAdmin,
                DataEventRecordsRole = user.DataEventRecordsRole,
                SecuredFilesRole = user.SecuredFilesRole
            });
        }

        [HttpPost]
        [ValidateAntiForgeryToken]
        public async Task<IActionResult> Edit(string id, [Bind("Email,IsAdmin,DataEventRecordsRole,SecuredFilesRole")] AdminViewModel adminViewModel)
        {
            if (id != adminViewModel.Email)
            {
                return NotFound();
            }

            if (ModelState.IsValid)
            {
                try
                {
                    var user = await _userManager.FindByEmailAsync(id);
                    user.IsAdmin = adminViewModel.IsAdmin;
                    user.DataEventRecordsRole = adminViewModel.DataEventRecordsRole;
                    user.SecuredFilesRole = adminViewModel.SecuredFilesRole;

                    await _userManager.UpdateAsync(user);
                }
                catch (DbUpdateConcurrencyException)
                {
                    if (!AdminViewModelExists(adminViewModel.Email))
                    {
                        return NotFound();
                    }
                    else
                    {
                        throw;
                    }
                }
                return RedirectToAction(nameof(Index));
            }
            return View(adminViewModel);
        }

        public async Task<IActionResult> Delete(string id)
        {
            if (id == null)
            {
                return NotFound();
            }

            var user = await _userManager.FindByEmailAsync(id);
            if (user == null)
            {
                return NotFound();
            }

            return View(new AdminViewModel
            {
                Email = user.Email,
                IsAdmin = user.IsAdmin,
                DataEventRecordsRole = user.DataEventRecordsRole,
                SecuredFilesRole = user.SecuredFilesRole
            });
        }

        [HttpPost, ActionName("Delete")]
        [ValidateAntiForgeryToken]
        public async Task<IActionResult> DeleteConfirmed(string id)
        {
            var user = await _userManager.FindByEmailAsync(id);
            await _userManager.DeleteAsync(user);
            return RedirectToAction(nameof(Index));
        }

        private bool AdminViewModelExists(string id)
        {
            return _context.Users.Any(e => e.Email == id);
        }
    }
}

Running the application

When the application is started, the ADMIN menu can be clicked, and the users can be managed by administrators.

Links

http://benfoster.io/blog/customising-claims-transformation-in-aspnet-core-identity

https://adrientorris.github.io/aspnet-core/identity/extend-user-model.html

https://docs.microsoft.com/en-us/aspnet/core/security/authentication/identity?view=aspnetcore-2.1&tabs=visual-studio

ASP.NET Core MVC Ajax Form requests using jquery-unobtrusive

$
0
0

This article shows how to send Ajax requests in an ASP.NET Core MVC application using jquery-unobtrusive. This can be tricky to setup, for example when using a list of data items with forms using the onchange Javascript event, or the oninput event.

Code: https://github.com/damienbod/AspNetCoreBootstrap4Validation

Setting up the Project

The project uses the npm package.json file, to add the required front end packages to the project. jquery-ajax-unobtrusive is added as well as the other required dependencies.

{
  "version": "1.0.0",
  "name": "asp.net",
  "private": true,
  "devDependencies": {
    "bootstrap": "4.1.3",
    "jquery": "3.3.1",
    "jquery-validation": "1.17.0",
    "jquery-validation-unobtrusive": "3.2.10",
    "jquery-ajax-unobtrusive": "3.2.4"
  }
}

bundleconfig.json is used to package and build the Javascript and the css files into bundles. The BuildBundlerMinifier NuGet package needs to be added to the project for this to work.

The Javascript libraries are packaged into 2 different bundles, vendor-validation.min.js and vendor-validation.min.js.

// Vendor JS
{
    "outputFileName": "wwwroot/js/vendor.min.js",
    "inputFiles": [
      "node_modules/jquery/dist/jquery.min.js",
      "node_modules/bootstrap/dist/js/bootstrap.bundle.min.js"
    ],
    "minify": {
      "enabled": true,
      "renameLocals": true
    },
    "sourceMap": false
},
// Vendor Validation JS
{
    "outputFileName": "wwwroot/js/vendor-validation.min.js",
    "inputFiles": [
      "node_modules/jquery-validation/dist/jquery.validate.min.js",
      "node_modules/jquery-validation/dist/additional-methods.js",
      "node_modules/jquery-validation-unobtrusive/dist/jquery.validate.unobtrusive.min.js",
      "node_modules//jquery-ajax-unobtrusive/jquery.unobtrusive-ajax.min.js"
    ],
    "minify": {
      "enabled": true,
      "renameLocals": true
    },
    "sourceMap": false
}

The global bundles can be added at the end of the _Layout.cshtml file in the ASP.NET Core MVC project.


... 
    <script src="~/js/vendor.min.js" asp-append-version="true"></script>
    <script src="~/js/site.min.js" asp-append-version="true"></script>
    @RenderSection("scripts", required: false)
</body>
</html>

And the validation bundle is added to the _ValidationScriptsPartial.cshtml.

<script src="~/js/vendor-validation.min.js" asp-append-version="true"></script>

This is then added in the views as required.

@section Scripts  {
    @await Html.PartialAsync("_ValidationScriptsPartial")
}

Simple AJAX Form request

A form request can be sent as an Ajax request, by adding the html attributes to the form element. When the request is finished, the div element with the id attribute defined in the data-ajax-update parameter, will be replaced with the partial result response. The Html.PartialAsync method calls the initial view.

@{
    ViewData["Title"] = "Ajax Test Page";
}

<h4>Ajax Test</h4>

<form asp-action="Index" asp-controller="AjaxTest" 
      data-ajax="true" 
      data-ajax-method="POST"
      data-ajax-mode="replace" 
      data-ajax-update="#ajaxresult" >

    <div id="ajaxresult">
        @await Html.PartialAsync("_partialAjaxForm")
    </div>
</form>

@section Scripts  {
    @await Html.PartialAsync("_ValidationScriptsPartial")
}

The _partialAjaxForm.cshtml view implements the form contents. The submit button is required to send the request as an Ajax request.

@model AspNetCoreBootstrap4Validation.ViewModels.AjaxValidationModel 

<div asp-validation-summary="All" class="text-danger"></div>

<div class="form-group">
  <label for="name">Name</label>
  <input type="text" class="form-control" asp-for="Name" 
     id="AjaxValidationModelName" aria-describedby="nameHelp" 
     placeholder="Enter name">
  <small id="nameHelp" class="form-text text-muted">
    We'll never share your name ...
  </small>
  <span asp-validation-for="Name" class="text-danger"></span>
</div>

<div class="form-group">
  <label for="age">Age</label>
  <input type="number" class="form-control" 
    id="AjaxValidationModelAge" asp-for="Age" placeholder="0">
  <span asp-validation-for="Age" class="text-danger"></span>
</div>

<div class="form-check ten_px_bottom">
  <input type="checkbox" class="form-check-input big_checkbox"
      asp-for="IsCool" id="AjaxValidationModelIsCool">
  <label class="form-check-label ten_px_left" for="IsCool">IsCool</label>
  <span asp-validation-for="IsCool" class="text-danger"></span>
</div>

<button type="submit" class="btn btn-primary">Submit</button>

The ASP.NET Core MVC controller handles the requests from the view. The first Index method in the example below, just responds to a plain HTTP GET.

The second Index method accepts a POST request with the Anti-Forgery token which is sent with each request. When the result is successful, a partial view is returned. The model state must also be cleared, otherwise the validation messages will not be reset.

If the page returns the incorrect result, ie just the content of the partial view, then the request was not sent asynchronously, but as a full page request. You need to check, that the front end packages are included correctly.

public class AjaxTestController : Controller
{
  public IActionResult Index()
  {
    return View(new AjaxValidationModel());
  }

  [HttpPost]
  [ValidateAntiForgeryToken]
  public IActionResult Index(AjaxValidationModel model)
  {
    if (!ModelState.IsValid)
    {
      return PartialView("_partialAjaxForm", model);
    }

    // the client could validate this, but allowed for testing server errors
    if(model.Name.Length < 3)
    {
      ModelState.AddModelError("name", "Name should be longer than 2 chars");
      return PartialView("_partialAjaxForm", model);
    }

    ModelState.Clear();
    return PartialView("_partialAjaxForm");
  }
}

Complex AJAX Form request

In this example, a list of data items are returned to the view. Each item in the list will have a form to update its data, and also the data will be updated using a checkbox onchange event or the input text oninput event and not the submit button.

Because a list is used, the div element to be updated must have a unique id. This can be implemented by creating a new GUID with each item, and can be used then in the name of the div to be updated, and also the data-ajax-update parameter.

@using AspNetCoreBootstrap4Validation.ViewModels
@model AjaxValidationListModel
@{
    ViewData["Title"] = "Ajax Test Page";
}

<h4>Ajax Test</h4>

@foreach (var item in Model.Items)
{
    string guid = Guid.NewGuid().ToString();

    <form asp-action="Index" asp-controller="AjaxComplexList" 
          data-ajax="true" 
          data-ajax-method="POST"
          data-ajax-mode="replace" 
          data-ajax-update="#complex-ajax-@guid">

        <div id="complex-ajax-@guid">
            @await Html.PartialAsync("_partialComplexAjaxForm", item)
        </div>
    </form>
}


@section Scripts  {
    @await Html.PartialAsync("_ValidationScriptsPartial")
}

The form data will send the update with an onchange Javascript event from the checkbox. This could be required for example, when the UX designer wants instant updates, instead of an extra button click. To achieve this, the submit button is not displayed. A unique id is used to identify each button, and the onchange event from the checkbox triggers the submit event using this. Now the form request will be sent using Ajax like before.

@model AspNetCoreBootstrap4Validation.ViewModels.AjaxValidationModel
@{
    string guid = Guid.NewGuid().ToString();
}

<div asp-validation-summary="All" class="text-danger"></div>

<div class="form-group">
    <label for="name">Name</label>

    <input type="text" class="form-control" asp-for="Name" 
      id="AjaxValidationModelName" aria-describedby="nameHelp" placeholder="Enter name"
      oninput="$('#submit-@guid').trigger('submit');">

    <small id="nameHelp" class="form-text text-muted">We'll never share your name ...</small>
    <span asp-validation-for="Name" class="text-danger"></span>
</div>
<div class="form-group">
    <label for="age">Age</label>

    <input type="number" asp-for="Age" 
      class="form-control" id="AjaxValidationModelAge" placeholder="0"
      oninput="$('#submit-@guid').trigger('submit');">

    <span asp-validation-for="Age" class="text-danger"></span>
</div>
<div class="form-check ten_px_bottom">

    @Html.CheckBox("IsCool", Model.IsCool,
        new { onchange = "$('#submit-" + @guid + "').trigger('submit');", @class = "big_checkbox" })

    <label class="form-check-label ten_px_left" >Check the checkbox to send a request</label>
</div>

<button style="display: none" id="submit-@guid" type="submit">Submit</button>

The ASP.NET Core controller returns the HTTP GET and POST like before.

using AspNetCoreBootstrap4Validation.ViewModels;

namespace AspNetCoreBootstrap4Validation.Controllers
{
    public class AjaxComplexListController : Controller
    {
        public IActionResult Index()
        {
            return View(new AjaxValidationListModel {
                Items = new List<AjaxValidationModel> {
                    new AjaxValidationModel(),
                    new AjaxValidationModel()
                }
            });
        }

        [HttpPost]
        [ValidateAntiForgeryToken]
        public IActionResult Index(AjaxValidationModel model)
        {
            if (!ModelState.IsValid)
            {
                return PartialView("_partialComplexAjaxForm", model);
            }

            // the client could validate this, but allowed for testing server errors
            if(model.Name.Length < 3)
            {
                ModelState.AddModelError("name", "Name should be longer than 2 chars");
                return PartialView("_partialComplexAjaxForm", model);
            }

            ModelState.Clear();
            return PartialView("_partialComplexAjaxForm", model);
        }
    }
}

When the requests are sent, you can check this using the F12 developer tools in the browser using the network tab. The request type should be xhr.

Links

https://dotnetthoughts.net/jquery-unobtrusive-ajax-helpers-in-aspnet-core/

https://www.mikesdotnetting.com/article/326/using-unobtrusive-ajax-in-razor-pages

https://www.learnrazorpages.com/razor-pages/ajax/unobtrusive-ajax

https://damienbod.com/2018/07/08/updating-part-of-an-asp-net-core-mvc-view-which-uses-forms/

https://ml-software.ch/blog/extending-client-side-validation-with-fluentvalidation-and-jquery-unobtrusive-in-an-asp-net-core-application

https://ml-software.ch/blog/extending-client-side-validation-with-dataannotations-and-jquery-unobtrusive-in-an-asp-net-core-application

Viewing all 169 articles
Browse latest View live